
|

|

|

|
'JellibiButton' 클래스는 이 신호를 손쉽게 처리 할 수 있게 도와줍니다. 더불어 버튼이 계속 눌려 있는지도 알 수 있게 도와줍니다.
| 버튼 명 | 핀(포트) 이름 |
|---|---|
| UP | A0 |
| Down | A1 |
| Right | D2 |
| Left | D4 |
설치 및 사용 방법을 아래에서 간략히 설명합니다.
아두이노를 설치 한 후 젤리비버튼과 같은 라이브러리를 다운로드하여 사용하는 방법은 여러가지가 있습니다. 그 중 가장 간단한 방법을 설명합니다.
-
라이브러리 다운로드하기
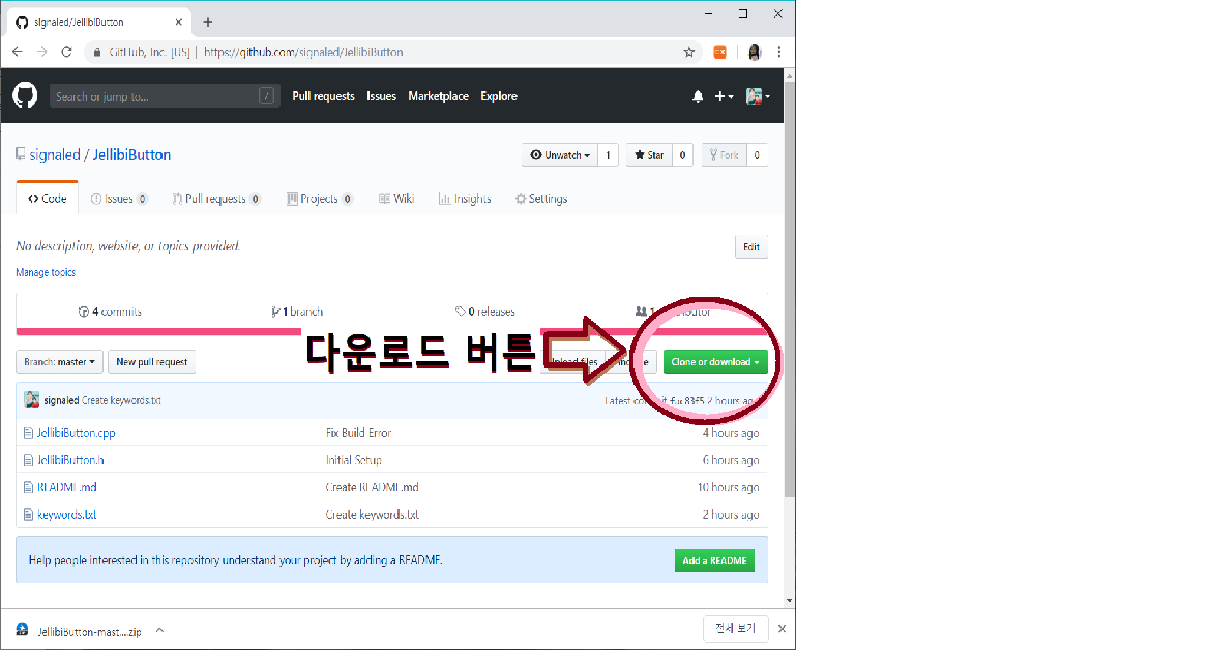
- 웹브라우져에서 JellibiButton 라이브러리의 깃허브(https://github.com/signaled/JellibiButton)로 이동합니다.
- 깃허브의 Code 탭에서 [Clone or download] 버튼을 눌러 "zip" 파일로 다운로드를 선택합니다.
-
JellibiButton 라이브러리 적용하기
- 아두이노 프로그램을 실행합니다.
- 메뉴 > 스케치 > 라이브러리 포함하기 > .ZIP 라이브러리 추가 를 선택합니다.
- 파일 선택 창에서 다운로드 받은 JellibiButton-master.zip 을 선택합니다.
- 메뉴 > 스케치 > 라이브러리 포함히기 > JellibiButton-master 를 선택합니다.
void Init (int pinNumber, bool bRepeatFlag = false);버튼을 초기화 하는데 사용합니다.
int pinNumber 버튼과 연결된 포트의 핀번호
bool bRepeatFlag
true : 일정한 간격(50ms) 으로 이벤트 발생
false : 버튼을 눌렀을 때 이벤트 발생
bool Check();버튼이 눌렸는 지 검사하여 true 를 되돌려 줍니다.
#include <JellibiButton.h>

JellibiButton _rightButton;
JellibiButton _leftButton;
JellibiButton _downButton;
JellibiButton _upButton;

void Setup()
{
    Serial.begin(115200);
    _rightButton.Init(2, false);
    _leftButton.Init(4, false);
    _downButton.Init(A0, true);
    _upButton.Init(A1, true);
}

void loop()
{
    if (_rightButton.Check()) {
        Serial.print("right 버튼 누름 \n");
    }
    if (_leftButton.Check()) {
        Serial.print("left 버튼 누름 \n");
    }
    if (_upButton.Check()) {
        Serial.print("UP 버튼 누름 \n");
    }
    if (_downButton.Check()) {
        Serial.print("Down 버튼 누름\n");
    }
}