


Access to AI for free for anyone who is using Visual Studio 2022\2026.

FreeAIr is a Visual Studio extension which allows you to interact with any LLM which have OpenAI-compatible API. Even with local LLM! No artificial || political barrier injected in FreeAIr code.
Q: Wait, another one?!
A: Yes, yet another LLM VSIX :)
Q: Why? There is a fantastic Copilot!
A: Because Copilot is a subject of politics. Today you are enjoying Copilot, tomorrow your country has been banned from it. FreeAIr is not a political subject and provides no artificial barriers.
Q1: I have NO access to any LLM in Internet via public API.
Q2: I have NO rights to use any remote LLM because of license of the code I'm writing.
A: No problem! You can use local LLM, for example via KoboldCpp. Local LLM sends nothing to remote servers. See details below.
Main functions:
- Chat with any OpenAI-compatible LLM, in a tool window or in a small floating window right at the caret (
in situchat) - Voice prompting: dictate your prompt instead of typing it (4 speech-to-text backends, including a fully local one)
- Searching with natural language (with RAG support)
- Explain the code
- selected piece of the code
- whole file
- Comment the code
- selected piece of the code
- whole file
- Continue writing code according to the comments
- Composing commit message
- Whole line completion
- Generate unit tests
- Fix build errors
- Support for MCP servers and their tools.
- A Visual Studio MCP server is built into FreeAIr.
- Support for MSDN MCP server.
- Works in Visual Studio 2022 (17.14 and above) and Visual Studio 2026.
Are you a contributor rather than a user? Then ARCHITECTURE.md is for you.

- Install .NET 9 runtime.
- Install the extension through the Visual Studio Marketplace.
- If you want to use local inference, run your model and get its
endpoint,tokenand model name. - Run
Visual Studioand open your solution. - The first time FreeAIr runs, an info bar offers the setup wizard - use it to replace the shipped
sample configuration with your own agents, MCP servers and actions, step by step, with each step
explaining what it configures and why. On a first run it guides you through creating one agent
field by field, checks its endpoint is reachable, and lets you store the token as a reference to
an environment variable instead of pasting it. Its actions page warns about any action bound to an
agent that no longer exists, and offers a
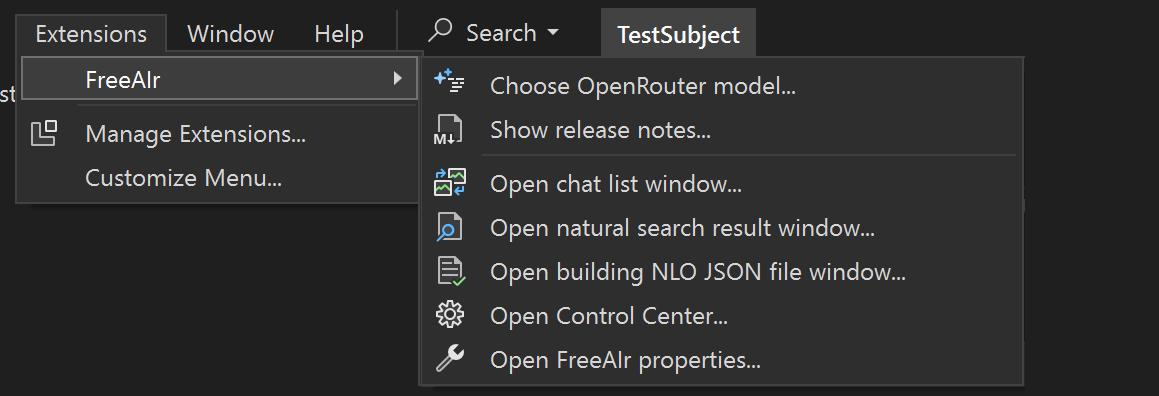
Use default valuesbutton that restores the shipped prompt library bound to your first agent. Whole line completion is switched on and off on that same page: while it is off its action is left alone, and once you turn it on it is bound and checked like any other. The MCP servers page can add the Microsoft Learn documentation server with a single checkbox. The wizard can also be opened any time later fromExtensions->FreeAIr->Open setup wizard...; nothing is written until its last page. - Click
Extensions->FreeAIr->Open control center. - In the window that opens, click
Edit agents. - Select any agent (for example,
Yandex General) and configureendpoint,token,chosen model. You can also fix the system prompt, but first use theReplace with general system promptbutton. - Click
Apply changesand the window will close. - You will return to the control center window, and the changes you made will be visible in the json text. Save the modified document to a file using
Store to options file. - Click
Extensions->FreeAIr->Open chat list window. - In the window that opens, select
Start chat, and select the model you configured. The model selection window may not appear if you have one model or only one model has a token set. - Start chatting with LLM.
- Agent is a specific combination of
endpoint,token, model name and its system prompt. The same LLM can act in different roles, the role is defined by its system prompt (for example,You are an experienced programmer...,You are a database programmer...). In this case, you will have two agents that have the sameendpoint,tokenand model name, but different system prompts. - Chat is a dialogue with LLM. You can have several dialogues, rename them and delete obsolete ones.
- In situ chat is the same chat, but shown in a small floating window right at the caret instead of a tool window.
- Chat context is additional information that is available to LLM, various files, selections, etc. are added there. This is more convenient than providing texts in the prompt itself.
- Natural Language Search is a FreeAIr feature that allows you to search your code base in natural human language.
- Natural Language Outlines are comments inside your solution documents. They are ultimately used by Natural Language Search to speed up searches.
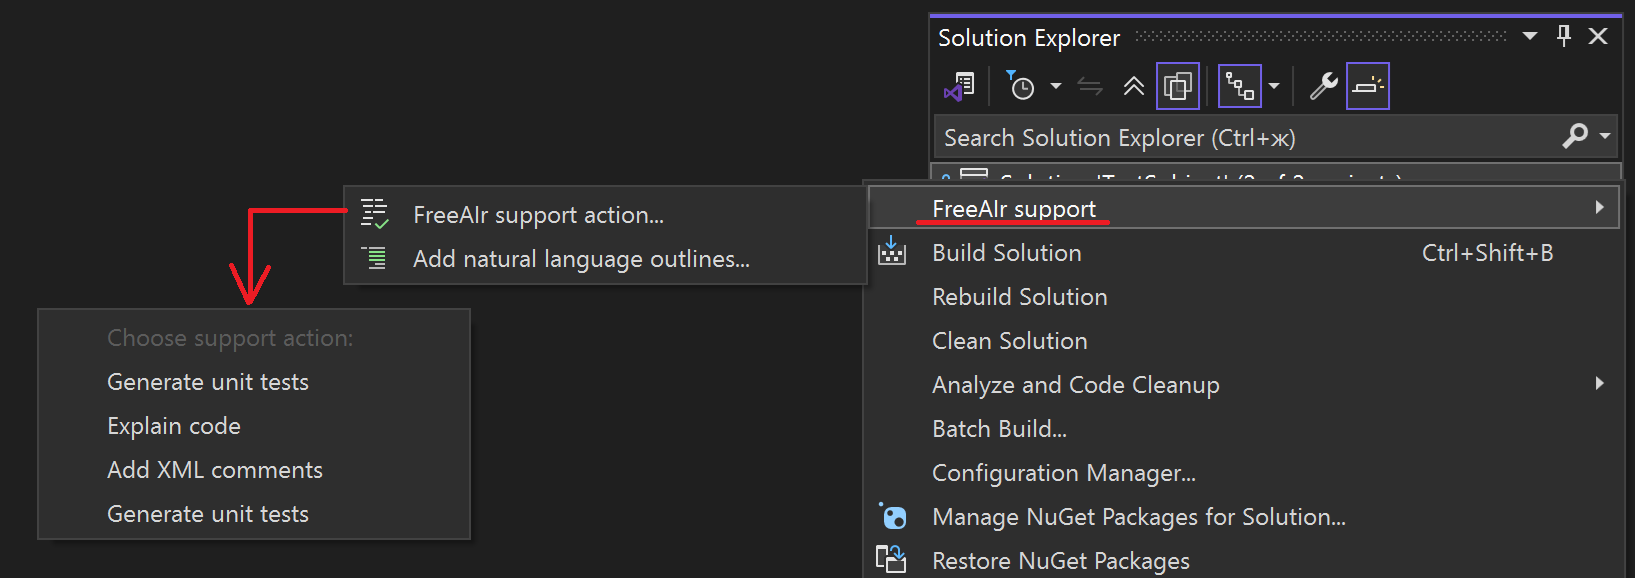
- Support Action is an action that FreeAIr can take in response to user actions in Visual Studio.
- Recorder is a speech-to-text backend which turns your dictation into the text of a prompt.
- MCP Servers are Model Context Protocol servers that provide additional capabilities to LLM.
- Tools are capabilities that selected MCP Servers offer.
FreeAIr settings are divided into two categories:
- Json settings that apply to the solution
- Settings for a specific Visual Studio user
This is a group of user-specific settings. Each member of your team can customize these settings for themselves, they are saved only locally in the Visual Studio instance.
For example, these are font size settings for the LLM dialog. They can be opened via Extensions -> FreeAIr -> Open FreeAIr properties.
This is a group of settings that makes sense to keep common for all members of your team. These settings can be saved in a json file, which is recommended to be committed to the git repository. Also, these settings can be saved inside Visual Studio, if, for some reason, it is undesirable to create a file.
The file is placed next to your solution, in .freeair\<solution name>_options.json. FreeAIr prefers it over the settings stored in Visual Studio: if the file exists, it wins.
These settings contain:
- agent settings
- MCP servers and their tools settings
- support action settings
- other settings, the meaning of which is described directly in the Json file.
An agent is a specific combination of endpoint, token, model name and its system prompt. The same LLM can act in different roles, the role is determined by its system prompt (e.g. You are an experienced programmer..., You are a database programmer...). In this case, you will have two agents with the same endpoint, token and model name, but different system prompts.
You can edit existing agents or add your own. If an agent does not have a token, the agent is considered inactive.
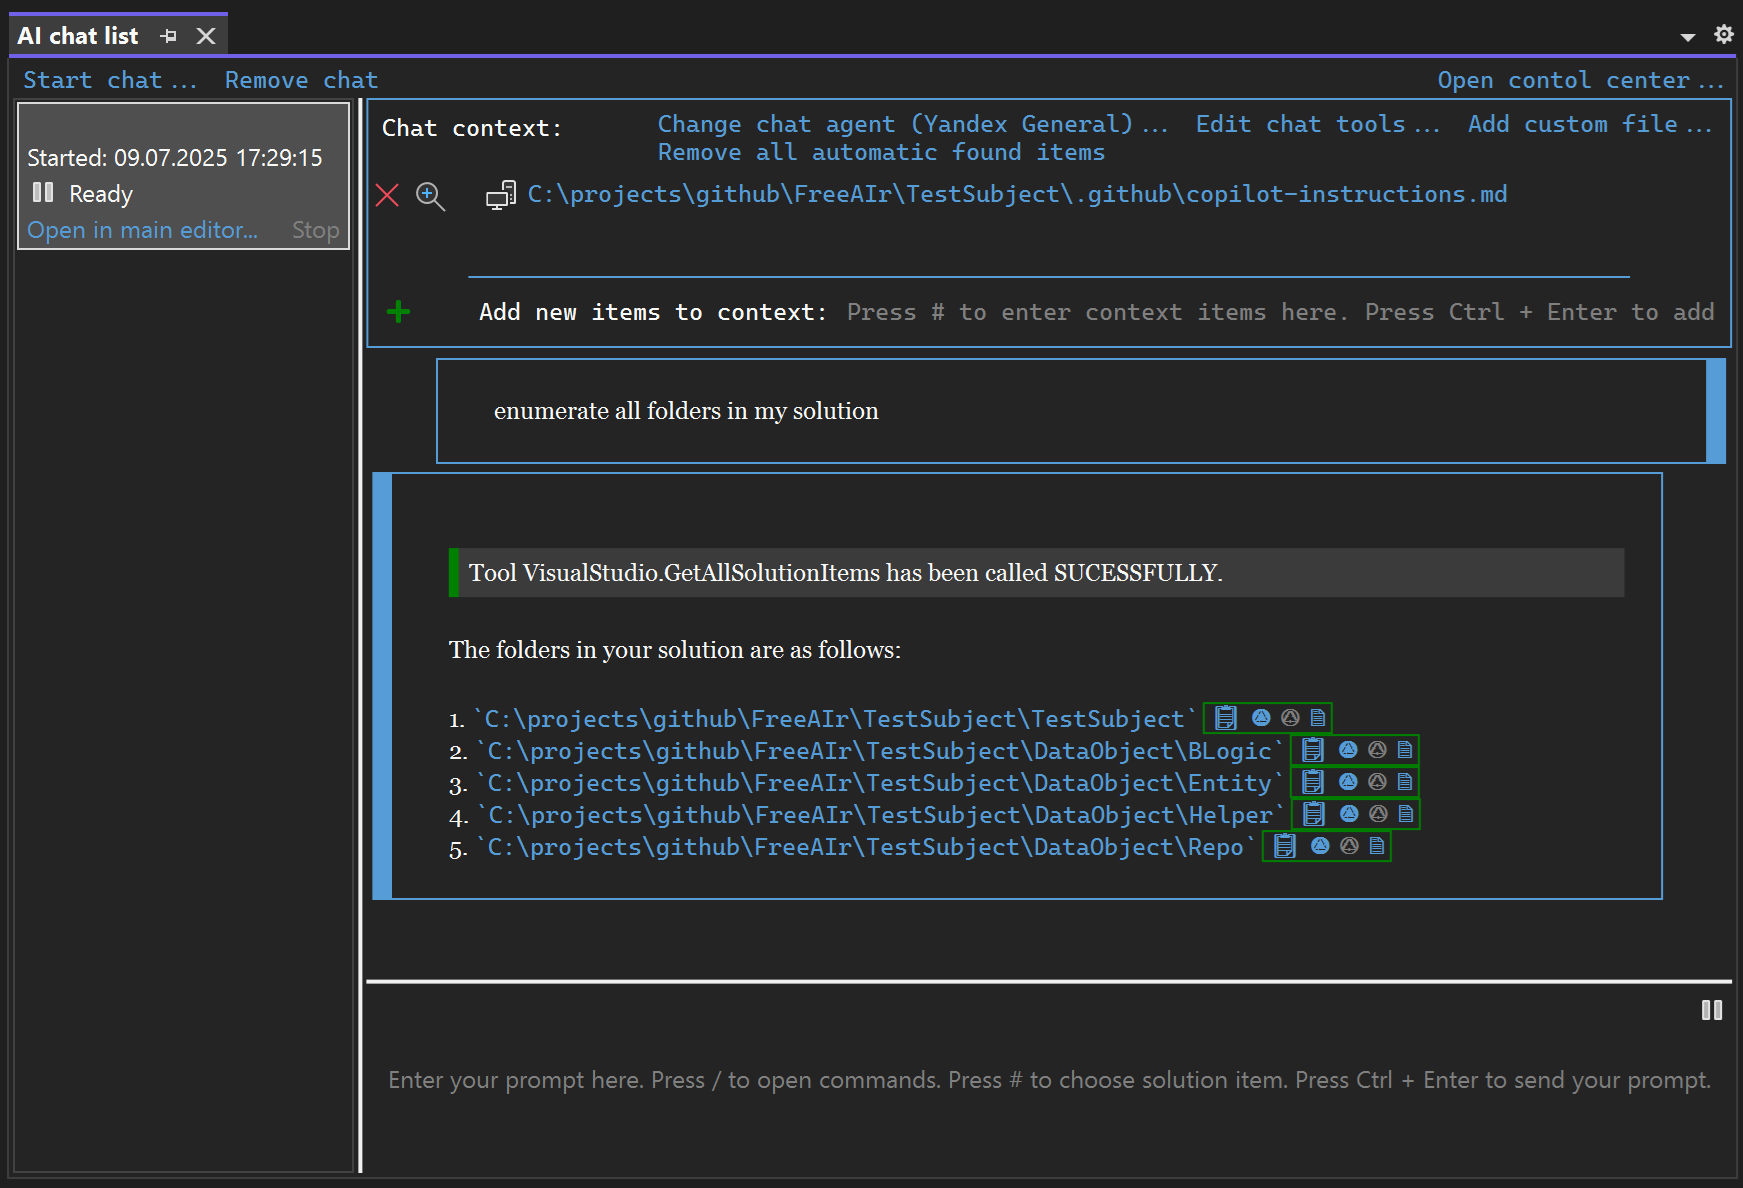
Chat is the core element of FreeAIr, where communication with LLM and code generation takes place.
The chat consists of three elements:
- the dialog area, which contains the user's prompts and LLM responses
- the area for the input prompt
- the chat context area
This area displays:
- Sent prompts
- Received responses from LLM
- Service information (e.g. MCP Server Tools calls)
The size of these elements is adjusted in Tools -> Options -> FreeAIr.
For some dialog elements (code chunks, images, etc.) special buttons are added to the text that allow you to conveniently operate these elements:
- Copy to clipboard
- Choose context item to replace its content
- Replace the selected block of the code in the VS document
- Create new file with this
The size of these buttons is also adjusted in Tools -> Options -> FreeAIr.
This is the area for entering a new prompt. To send the entered prompt, press Ctrl+Enter, after which the LLM will wait for a response. You can interrupt the response by pressing the Stop button.
You can also enter the following in this area:
- actions for FreeAIr: to do this, enter
/and select an action from the list; the list of available support actions is specified in the JSON settings. - solution documents: to do this, enter
#and select the required document.
The chat context is additional information for LLM, for example, documents from your solution are often added to the context. You can add to the context:
- your solution document, to do this, type
#, select a document from the list and press Ctrl+Enter. - an external document, to do this, click the
Add custom filebutton.
If your project is configured to use Microsoft Copilot, the copilot-instructions.md file will be automatically added to the chat context when creating a chat.
If your project is written in C#, you can add all files dependent on the already added file to the chat context so that LLM gets more context. There is a corresponding button next to the document name for this.
Every chat has a name which is shown in the chat list. FreeAIr suggests a name automatically, and you can rename any chat by clicking on its name.
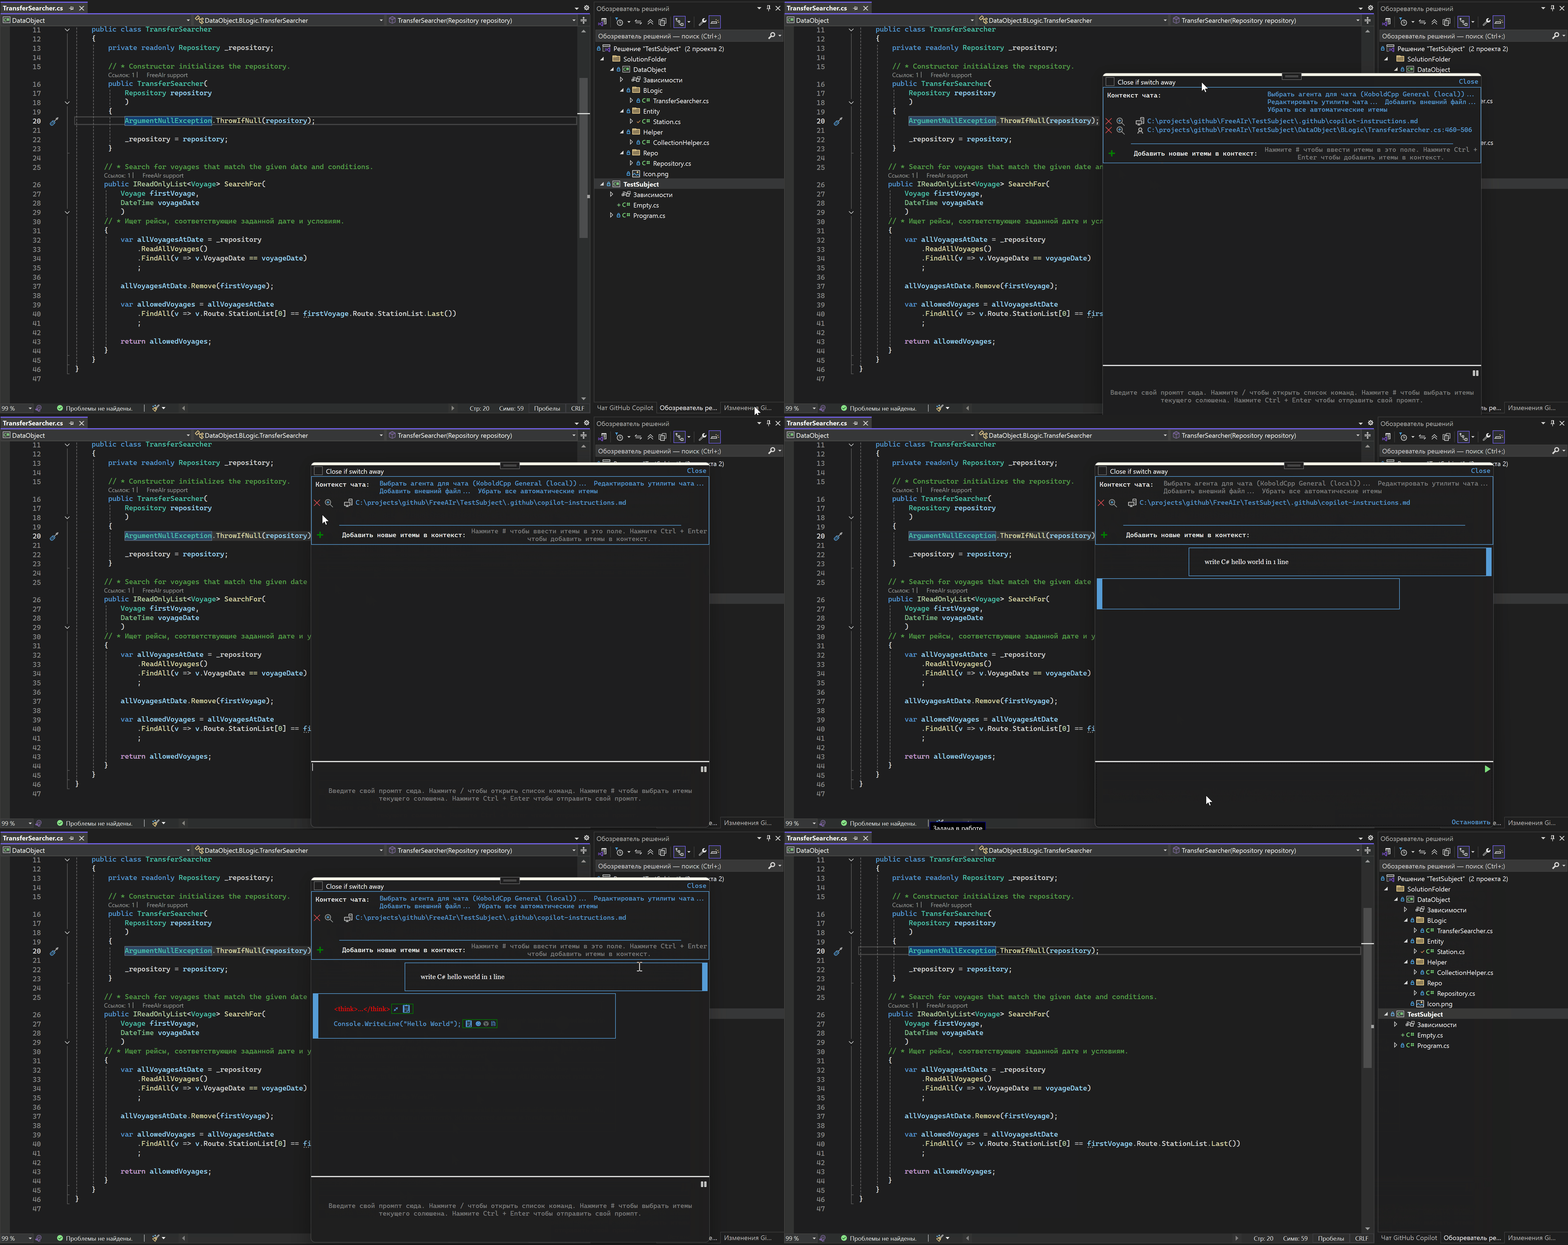
Besides the chat tool window, FreeAIr can open a small floating chat window right at the caret, without taking you away from the code you are editing. Press Alt+Z (or use FreeAIr start chat here in the editor context menu) and the window will appear at the current position. Hold Ctrl while invoking the command to continue the previous chat instead of starting a new one.
The in situ window:
- becomes semi-transparent when it loses the focus, so it does not hide your code;
- can be resized by dragging the resize control in its corner;
- can be closed automatically as soon as you switch away from it — this behaviour is controlled in
Tools->Options->FreeAIr->UI.
Instead of typing a prompt you can dictate it. In the chat prompt area, press and hold the right Ctrl key and speak; when you release the key the recognized text is appended to the prompt.
Left-clicking the recorder icon opens a menu where you can:
- choose the speech-to-text backend;
- choose the post-process support action;
- enable or disable voice prompting entirely.
Four backends are available:
Microsoft speech API recorder and transcriber— the classic System.Speech recognizer, works out of the box.WinRT recorder and transcriber— the Windows speech recognizer.Whisper local (using Whisper.Net; processing on Vulkan or CPU)— a fully local Whisper. You need to download a model file from huggingface and specify its path.Whisper OpenAI API (including local LLMs)— Whisper behind any OpenAI-compatible endpoint, local or remote.
Backend-specific settings (model paths, tokens, endpoints, prompts) live in Tools -> Options -> FreeAIr -> Recording audio.
Speech recognition of technical speech is far from perfect, so the transcribed text can optionally be passed through an LLM before it lands into the prompt area. That post-processing step is an ordinary support action with the RecordPostProcess scope, so you fully control its prompt and the agent that performs it.
| Shortcut | Action |
|---|---|
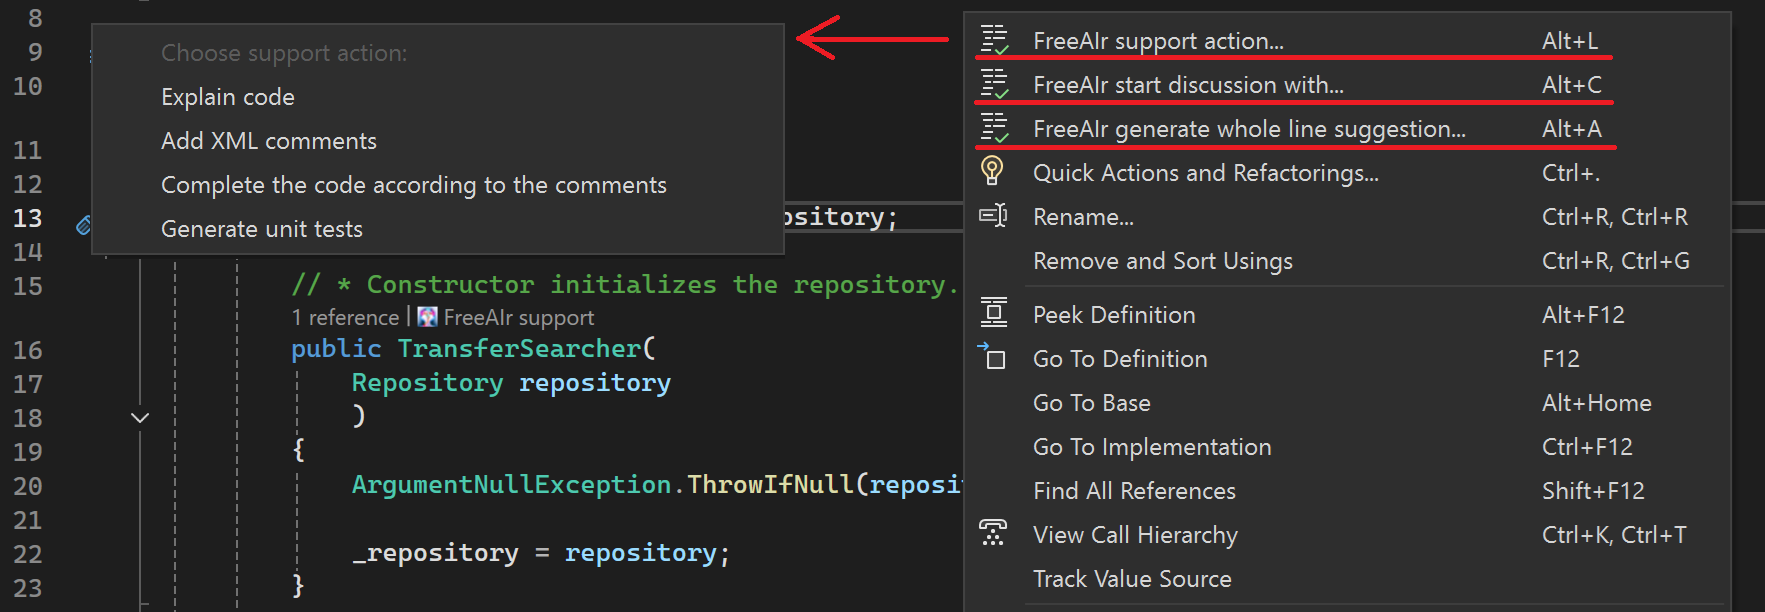
Alt+L |
Apply a support action to the current selection. |
Alt+C |
Start a discussion about the current selection. Hold Ctrl to add to the previous chat. |
Alt+A |
Generate a whole line suggestion at the caret. |
Alt+Z |
Open the in situ chat at the caret. Hold Ctrl to add to the previous chat. |
Ctrl+Enter |
Send the prompt (in the chat prompt area). |
hold right Ctrl |
Record the prompt by voice (in the chat prompt area). |
The actions that FreeAIr can offer the user are not encoded in the FreeAIr code. The list of actions is part of the Json settings file in the Supports/Actions section.
Each action consists of:
- name.
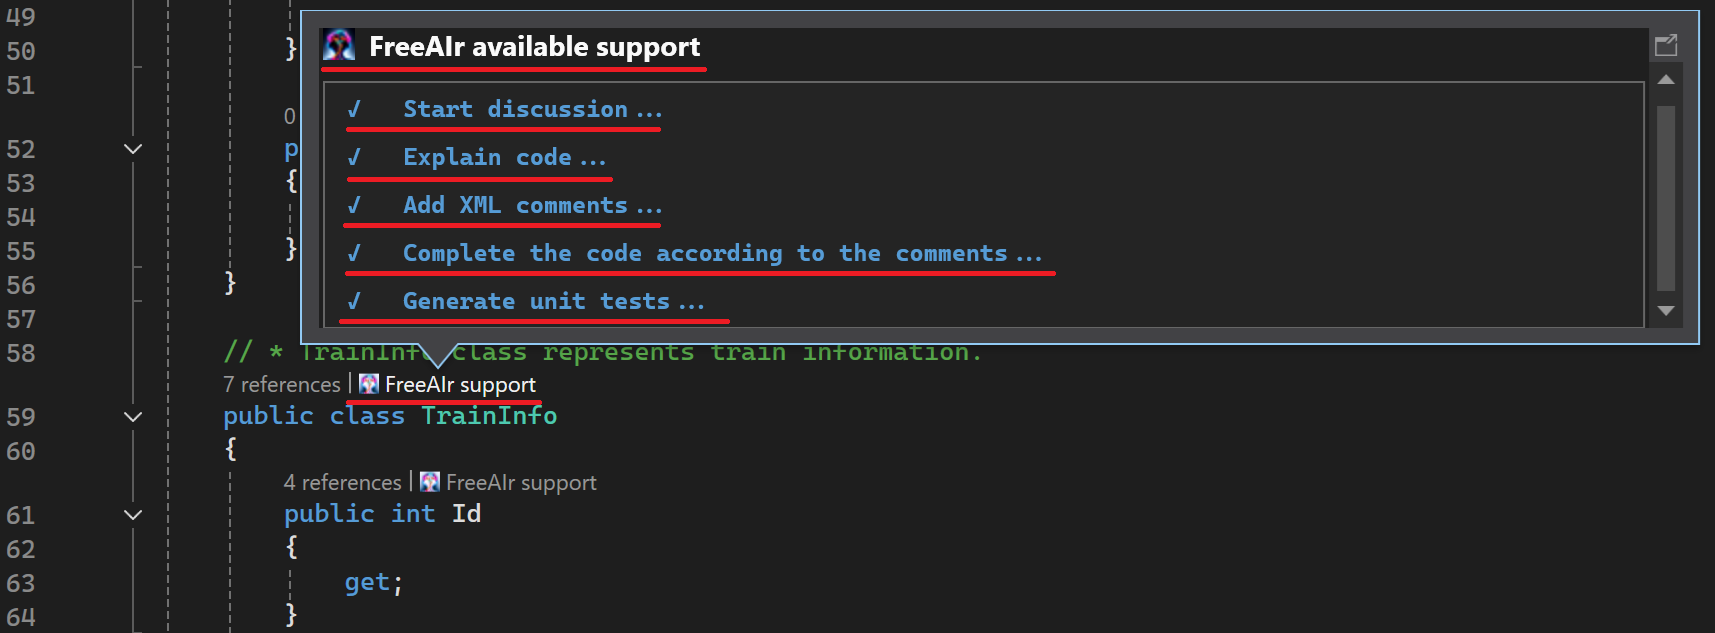
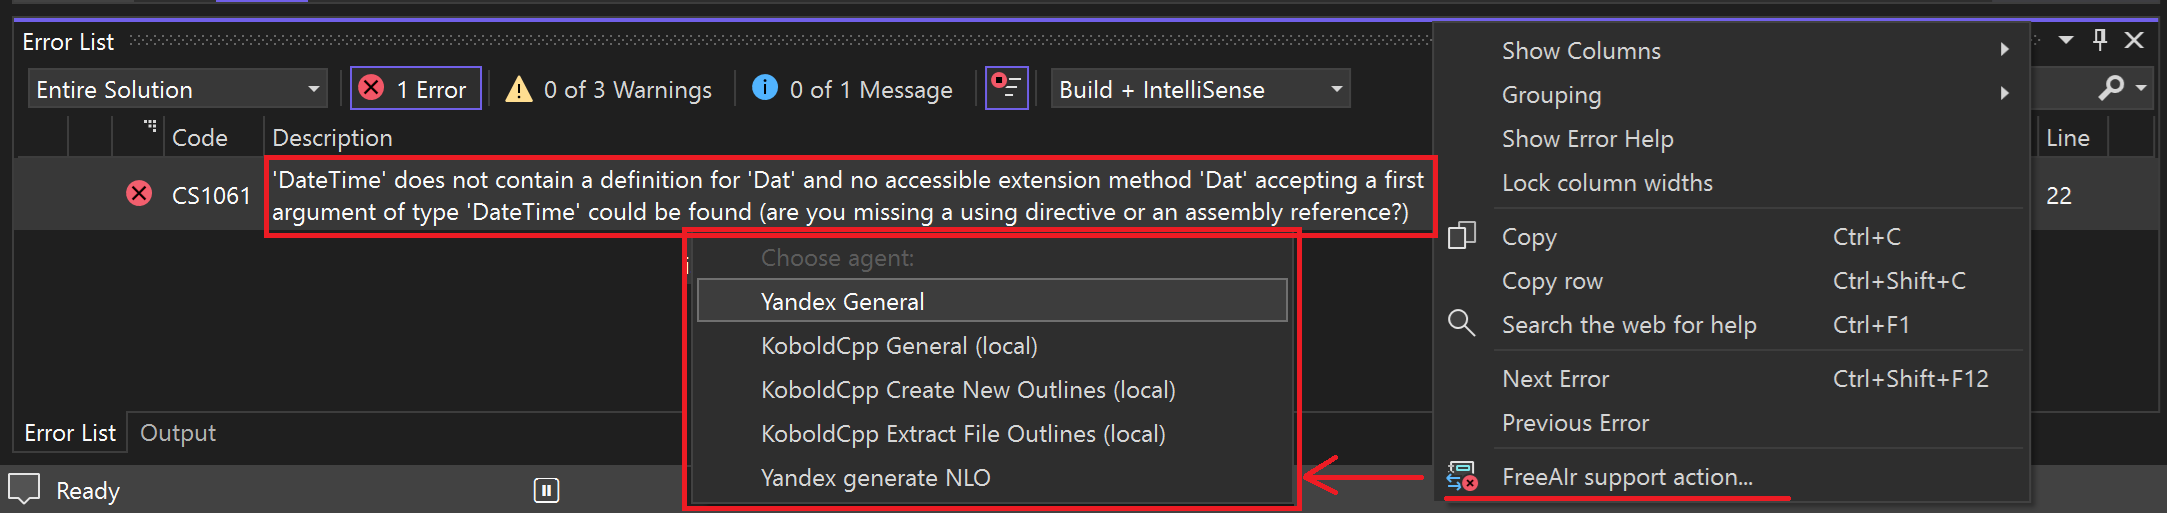
- scope collection: for which user actions this support action should be applied (for example, when working with the document code; inside codelens; when working with files in Solution Explorer; when forming a commit message, etc.).
- prompt with anchors.
- name of the agent who should perform this action. If the agent name is not specified, FreeAIr will offer the user to select an agent manually.
- image moniker - used as an icon to display in the prompt input control in the FreeAIr chat.
The scopes are:
| Scope | When the action is offered |
|---|---|
SelectedCodeInDocument |
A piece of code is selected in the editor. |
CodelensInDocument |
The FreeAIr codelens is clicked. |
FileInSolutionTree |
Files are selected in Solution Explorer. |
BuildErrorWindow |
An error is selected in the Error List. |
EnterPromptControl |
/ is typed in the chat prompt area. |
CommitMessageBuilding |
A commit message is being composed in Git Changes. |
NaturalLanguageSearch |
A natural language search is started. |
GenerateNaturalLanguageOutlines |
Natural language outlines are being generated. |
BuildNaturalLanguageOutlines |
NLO embedding json files are being built. |
WholeLineCompletion |
A whole line completion is requested. |
RecordPostProcess |
A dictated prompt has been transcribed and is about to be post-processed. |
Anchors are placeholders in which the corresponding contextual information is added:
| Anchor | Replaced with |
|---|---|
{CONTEXT_ITEM_NAME} |
name of the document(s) in the chat context. |
{BUILD_ERROR_MESSAGE} |
text of the compilation error. |
{BUILD_ERROR_LINE} |
the line where the compilation error occurred. |
{BUILD_ERROR_COLUMN} |
the column where the compilation error occurred. |
{UNIT_TEST_FRAMEWORK} |
the preferred unit test framework. |
{GIT_DIFF} |
a git diff with your changes. |
{NATURAL_LANGUAGE_SEARCH_QUERY} |
a natural language search query. |
{WHOLE_LINE_COMPLETION_ANCHOR} |
the marker of the place where the whole line completion is requested. |
{RECORDED_TEXT} |
the text transcribed from your voice. |
An anchor that has no value in the current context is replaced with an empty string.
You can edit existing and add your own support actions.
MCP Servers are Model Context Protocol servers that provide additional capabilities for LLM (e.g. database access, or git access). FreeAIr fully supports MCP Servers.
There are three categories of MCP servers:
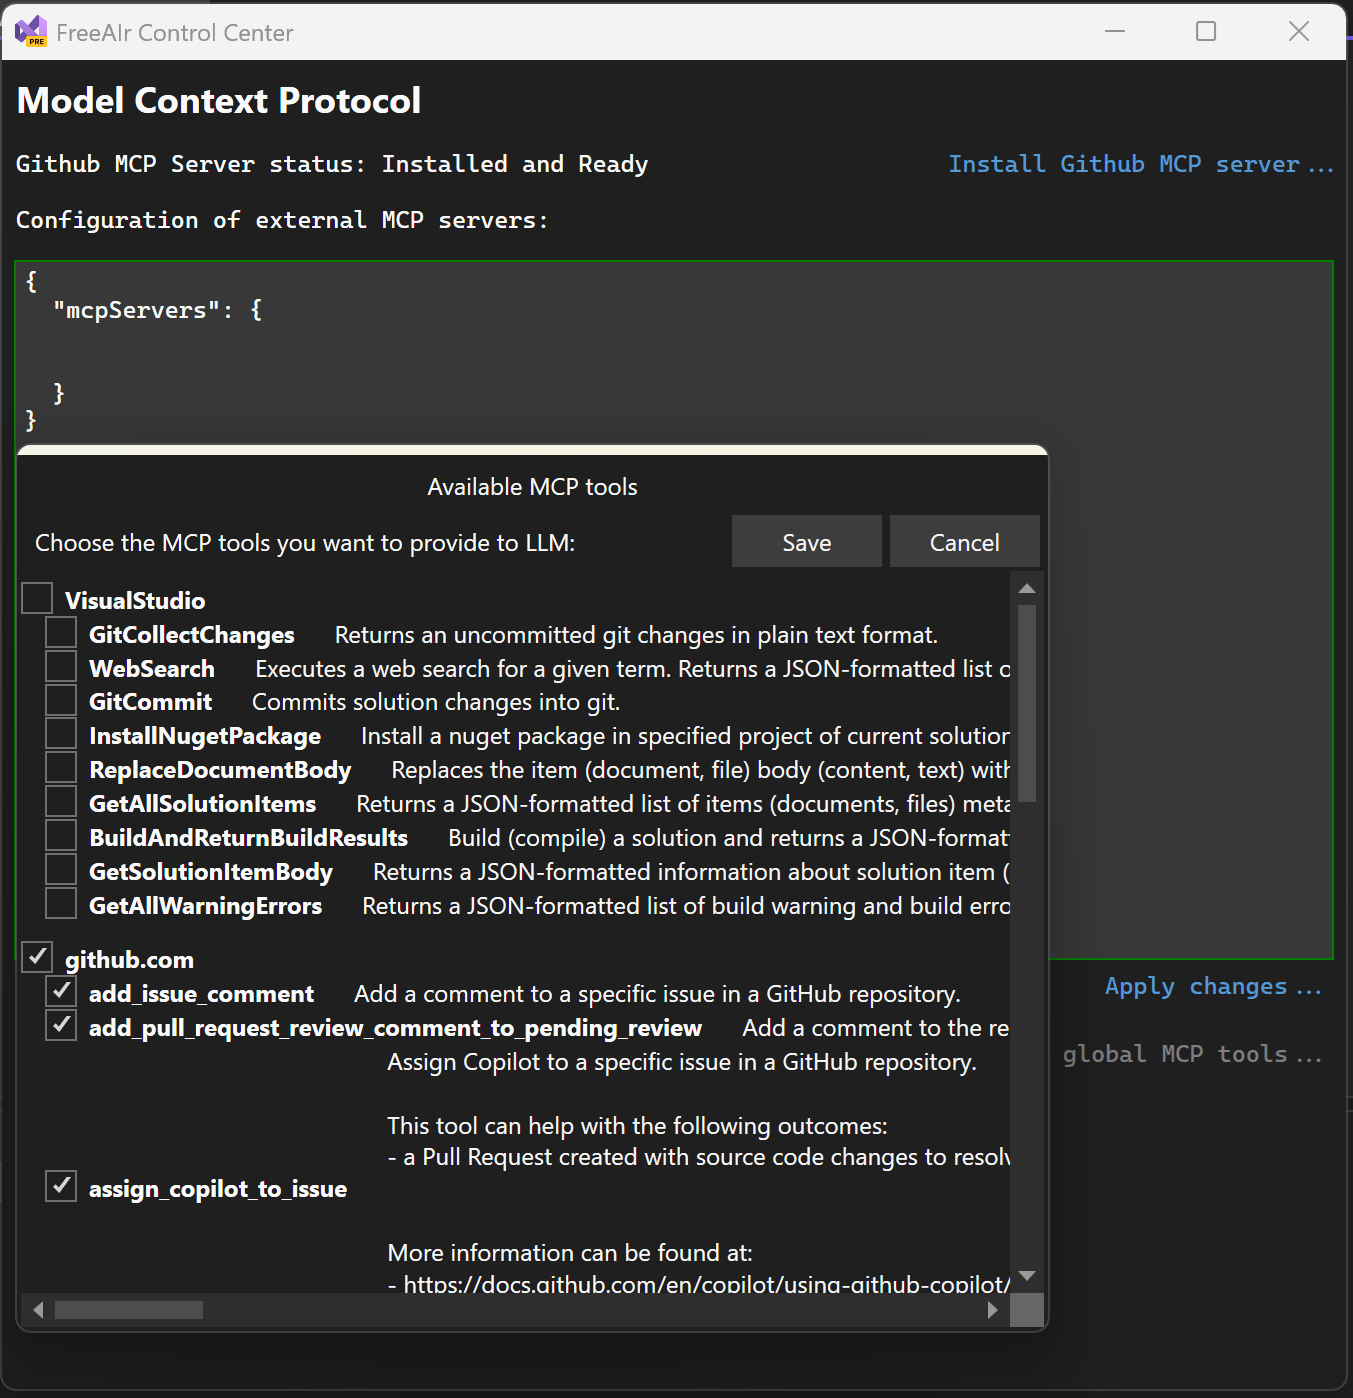
- Visual Studio Embedded MCP server - a FreeAIr built-in MCP server that provides LLM with the ability to perform actions inside Visual Studio (e.g. compile a project, change the text of a document, etc.).
- GitHub.com MCP server - this is a standard github.com MCP server; you can install it from the FreeAIr Control Panel.
- Other MCP servers - they can be "installed" by editing the corresponding section of FreeAIr Json settings. The format is the standard Claude format.
Each MCP server provides its own set of tools. You can edit the set of MCP servers and their tools and commit this file to the repository. When creating a chat, the selected tools are copied to the chat and you can enable/disable tools inside the chat, this does not affect the status of global tools.
Examples of prompts that LLM can execute if it is provided with the appropriate tools:
commit my changes with message "newcommit"install a 3.3.6 version of "Ninject" nuget package in TestSubject project
This MCP server provides LLM with the ability to work inside Visual Studio, such as:
- make a git commit.
- build solution and collect errors.
- install nuget package.
- get solution tree structure.
- get document body.
- replace document body.
- and others.
This MCP server is available immediately and does not require any configuration steps.
Github.com MCP server is a server that provides LLM with the ability to work with a repository on github.com. For example, through this server you can ask LLM to get a list of issues and ask LLM to fix one of them.
To install this server, click the corresponding button in the FreeAIr Control Center. The latest version of github.com MCP server will be downloaded and installed.
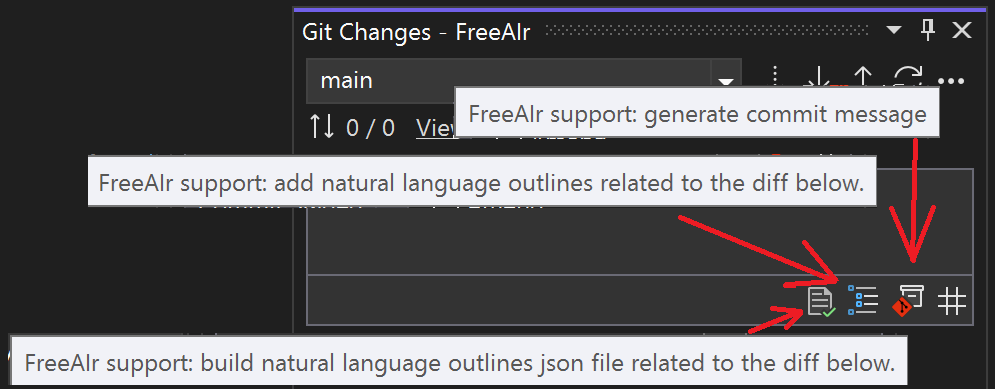
FreeAIr allows a Visual Studio user to use LLM to generate a commit message. To do this, switch to the Git Changes tab and click the corresponding button. A new chat with LLM will start, and when a response is received, the commit message will be copied to the Enter a message field.
An example of a prompt: suggest me the best commit message for my uncommitted changes.
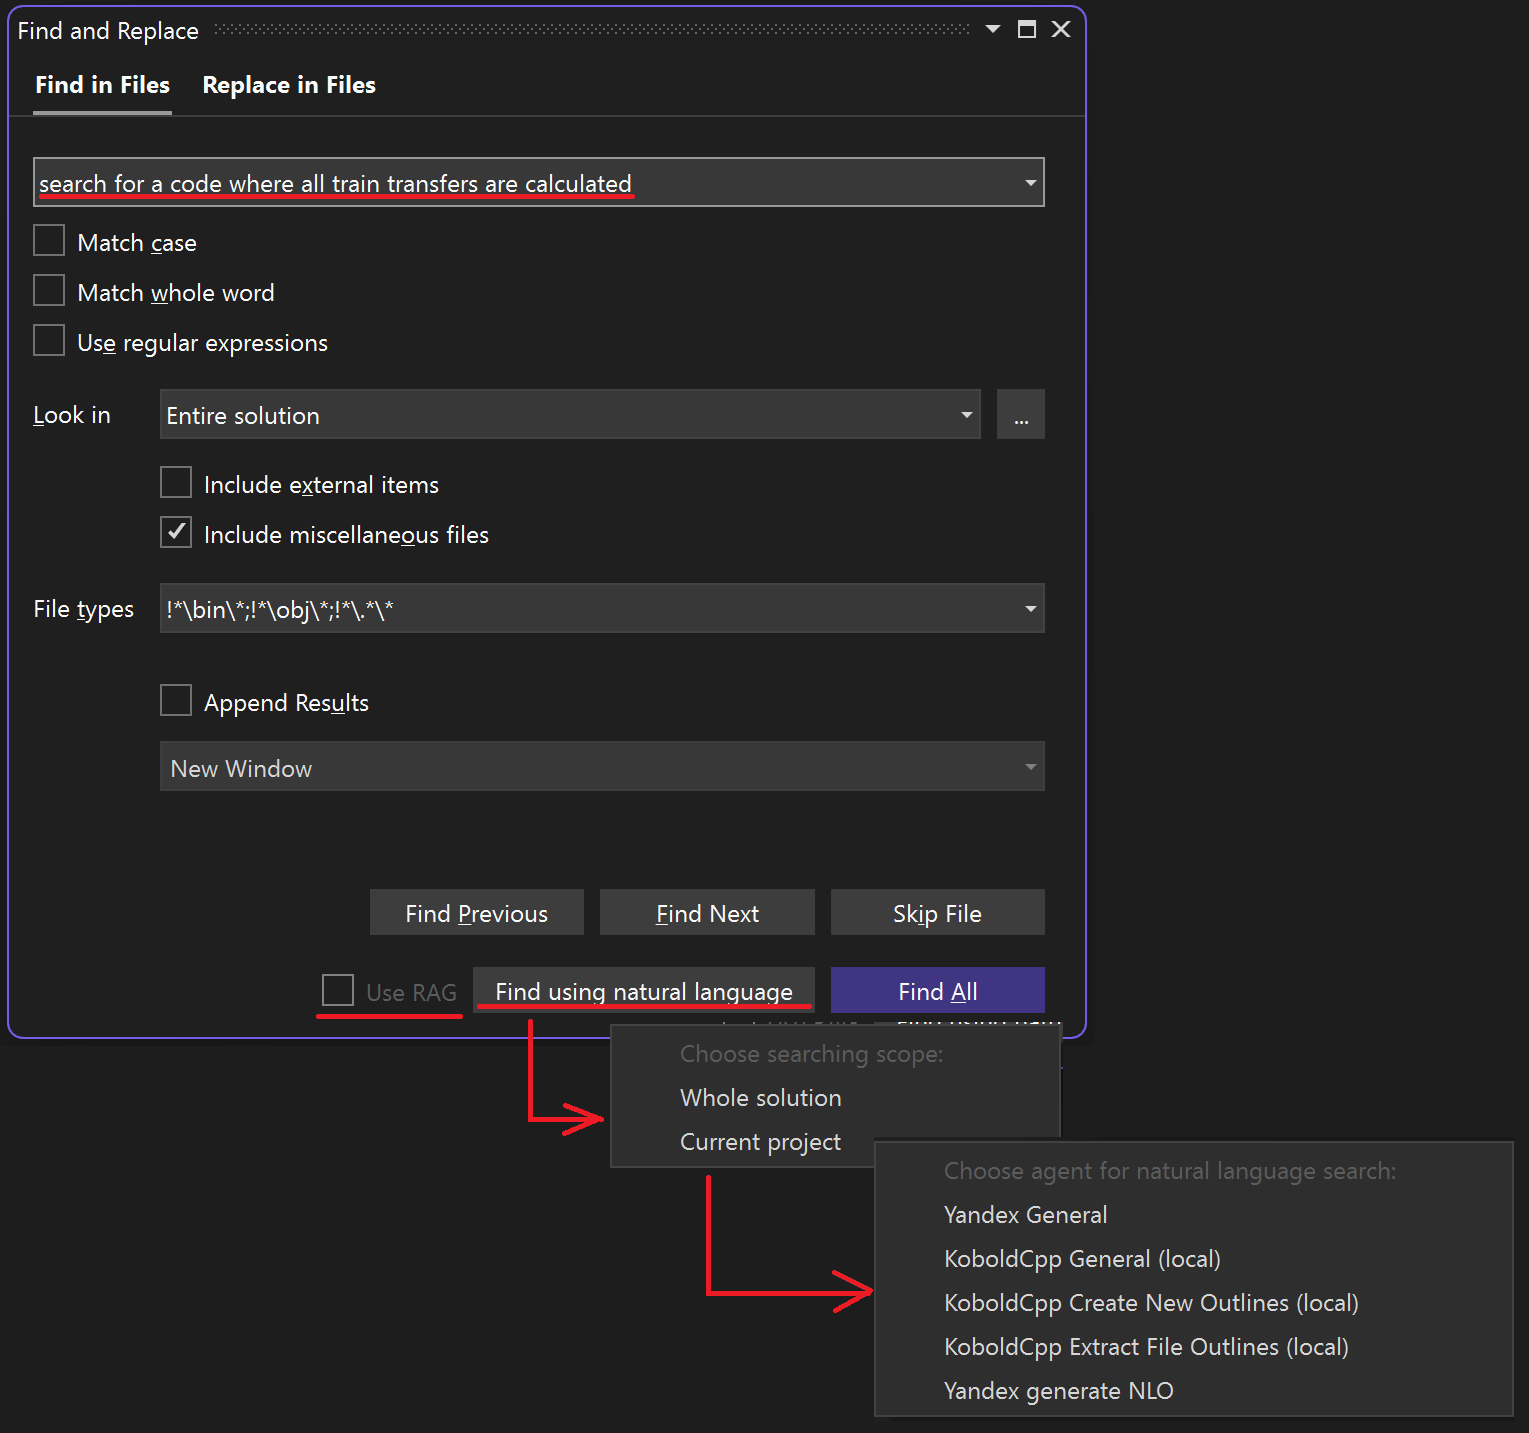
Using natural language to search in a solution or project helps you search code using fuzzy queries that focus on the meaning of the code rather than its text.
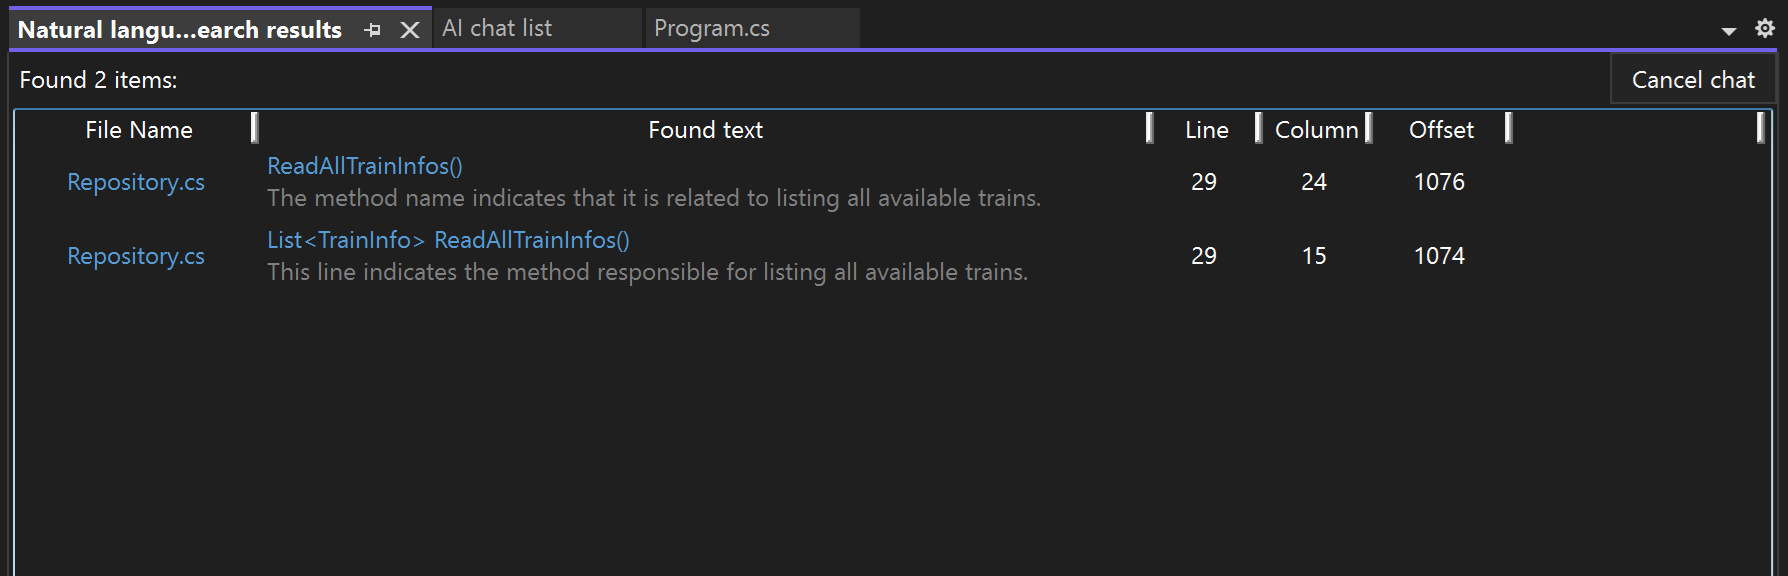
Each text file from the solution (project) is passed to LLM along with a search query, and LLM determines whether there is anything suitable in that file. After all files are processed, the results are collected in the search results window:
Since all project files are processed, searching can take a considerable amount of time. To speed it up, FreeAIr supports RAG using natural language outlines.
The search needs an agent with a token, because that is what every chat of FreeAIr needs. An agent of a locally running server usually carries no token, and if none of your agents has one the search says so instead of doing nothing.
With Use RAG checked, a second agent is involved: the one that turns your query into a vector. You are not asked for it as a rule — the index remembers the agent that built it, and that agent is taken, because a vector is only comparable with the vectors it is measured against when the same model produced both. You are asked only when that agent cannot be found: the index was built before FreeAIr started recording the name, or the agent has been renamed or deleted since. Then every agent is offered, whether it carries a token or not, and the name from the index is preselected if it still exists. Should you pick a different model by mistake, the search refuses to run rather than return noise — the index carries the fingerprint of the model that built it.
Both agents are named at the top of the results window, so the answers can be read together with what produced them. The Confidence column shows the model's own estimate as a word and a number — High (85), Medium (57), Low (20); the boundaries are 70 and 40.
If a search behaves in a way you did not expect, open the FreeAIr natural language search pane of the Output window: every step writes itself there — the scope, the action and the agents it has picked, how many files the mask has matched, what the shortlist has kept, how long the prompt was and how long the answer was. A search which stops early always leaves the reason there as the last line.
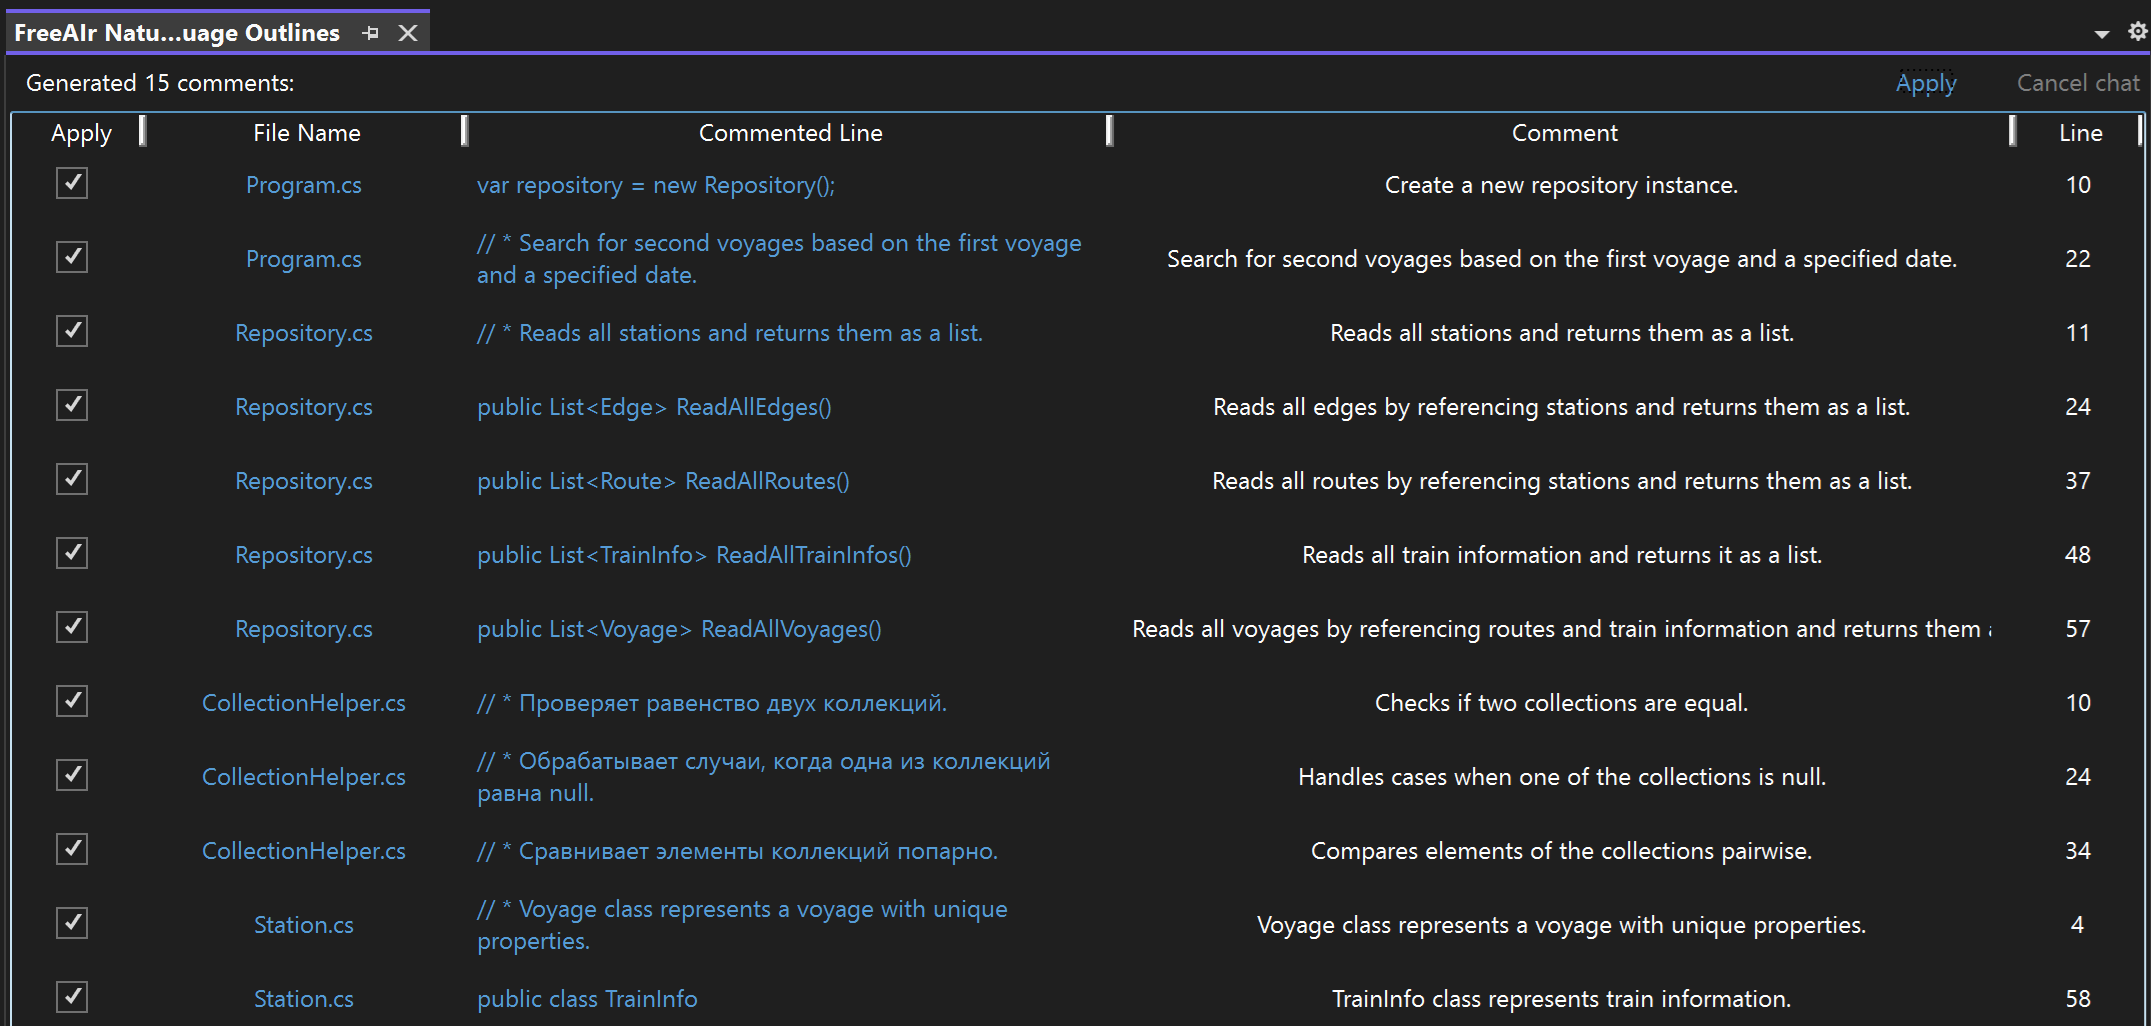
Natural Language Outlines are a special kind of comments embedded directly into the source code. These comments are generated by LLM, and are used to create embeddings that are used in RAG. In FreeAIr, NLOs are implemented according to paper.
The first step is to generate NLOs and add them to the source code files. When starting this work, you should generate NLOs for the entire solution via this menu:
Next, you can incrementally add NLOs to only those files that have been modified using this menu:
The NLO viewing and saving window itself is designed trivially:
By unchecking the box, you can enable or disable adding a specific outline. By clicking Apply you will save the outlines with the checkboxes set.
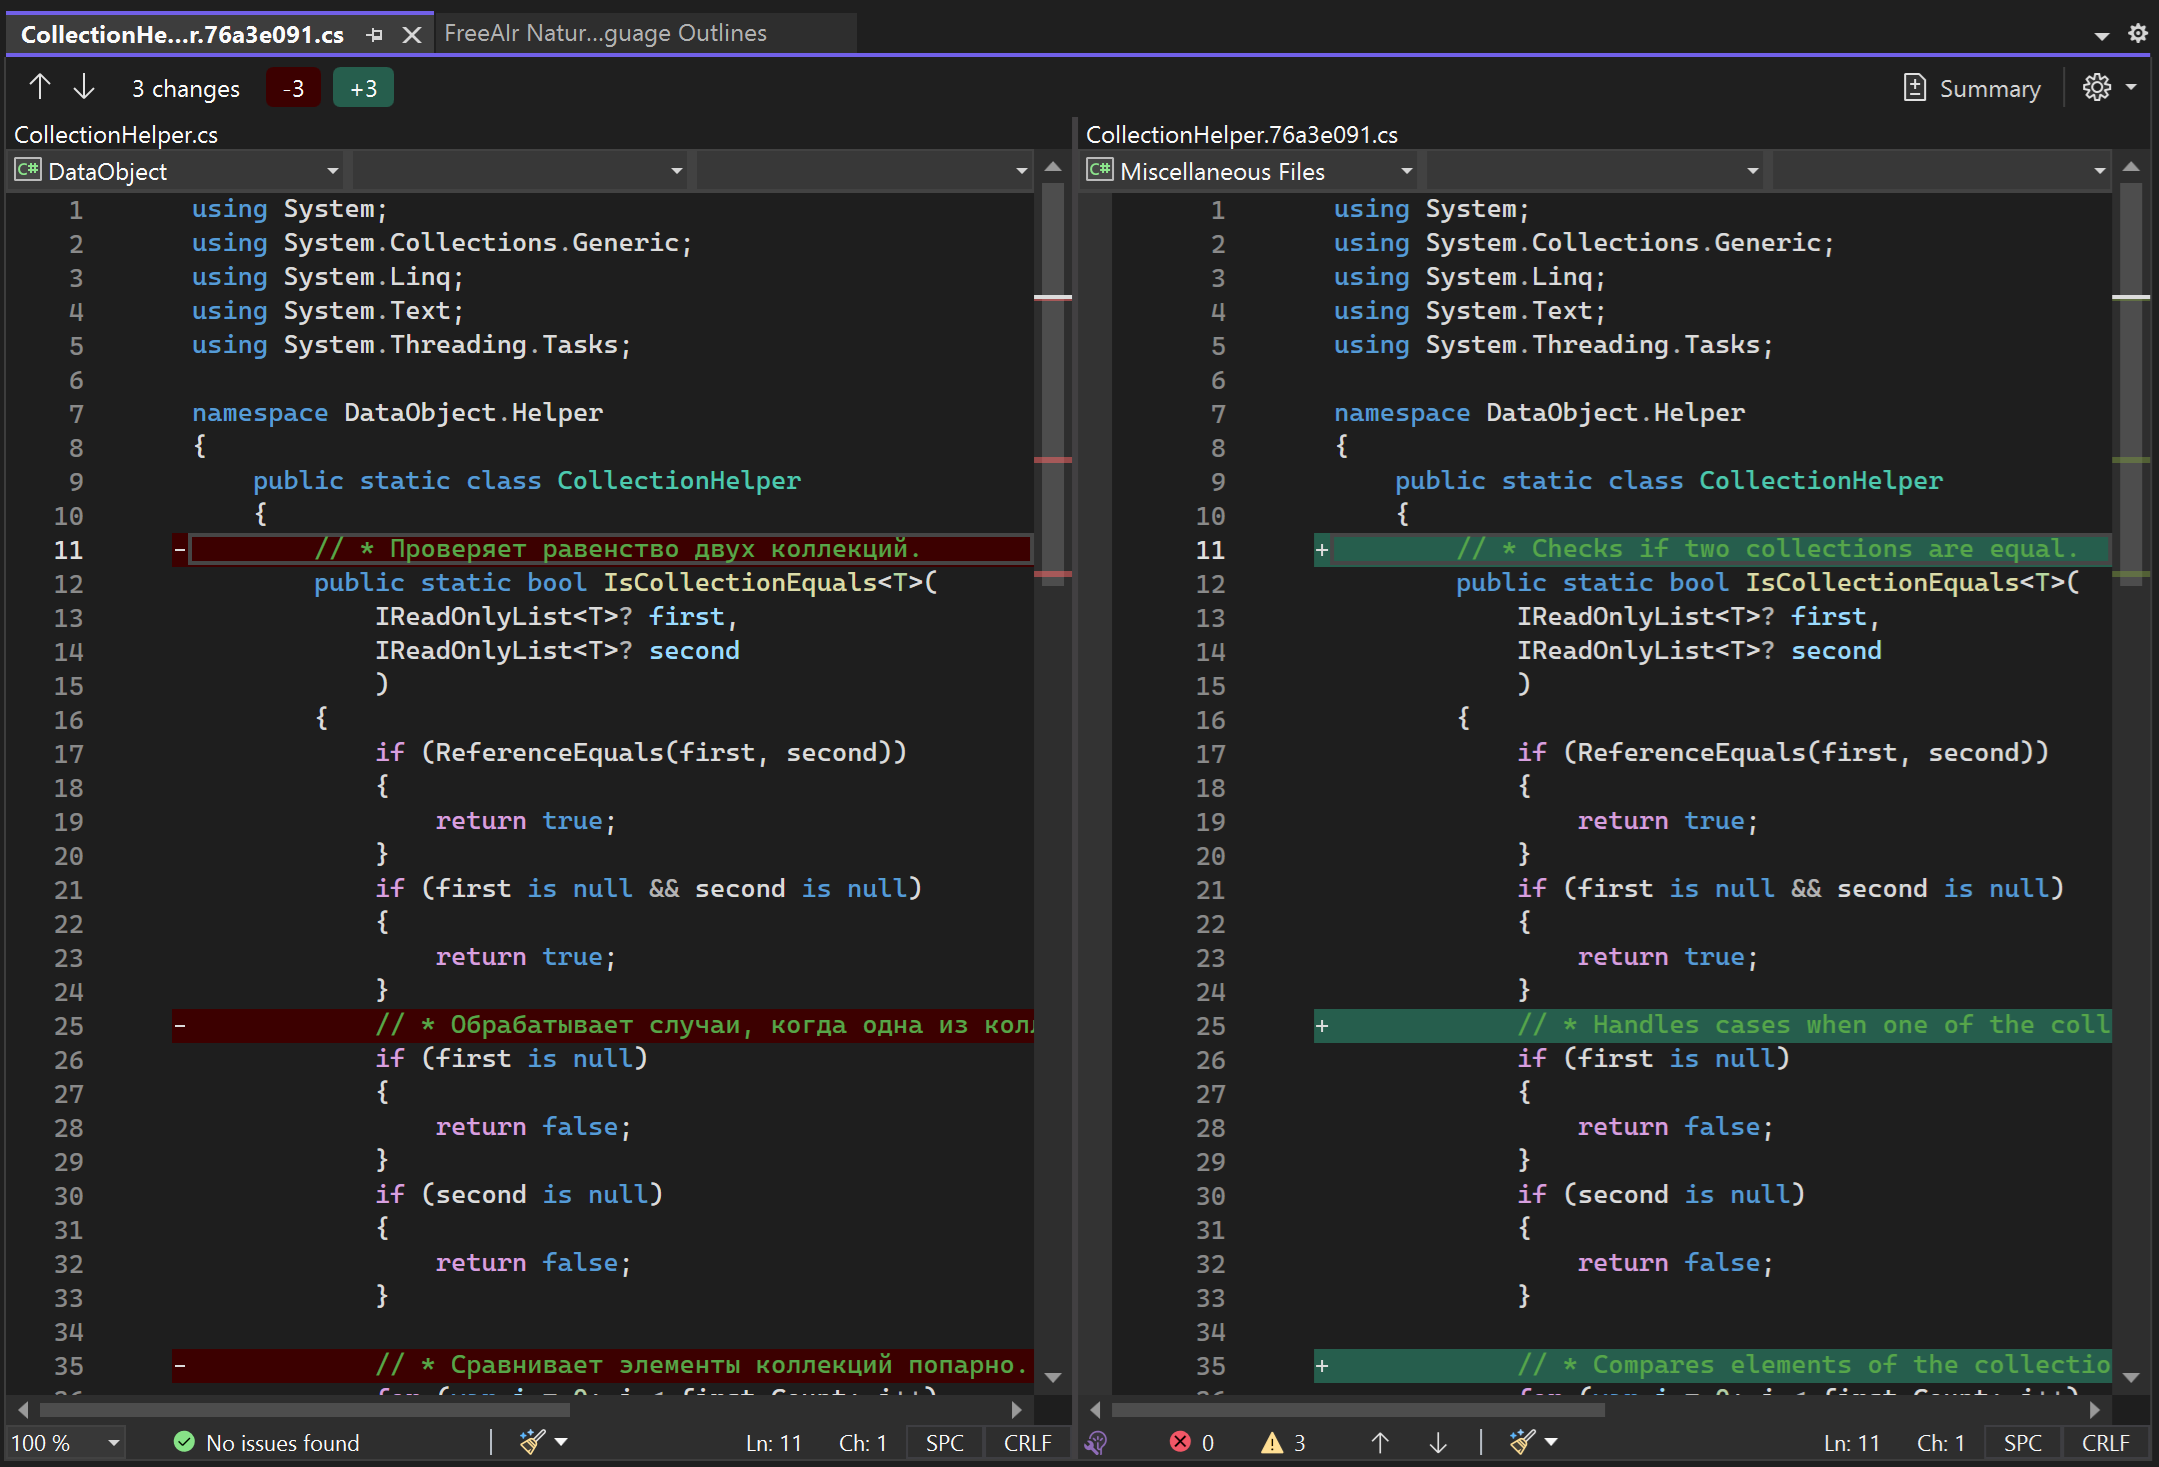
By left-clicking on the file name or the outline itself, you can view the proposed changes:
After adding (updating) NLO in the source code files, it is necessary to create (update) JSON files of a special type: NLO-embedding Json files. This can be done for the entire solution via the menu:
or only for modified files via the menu:
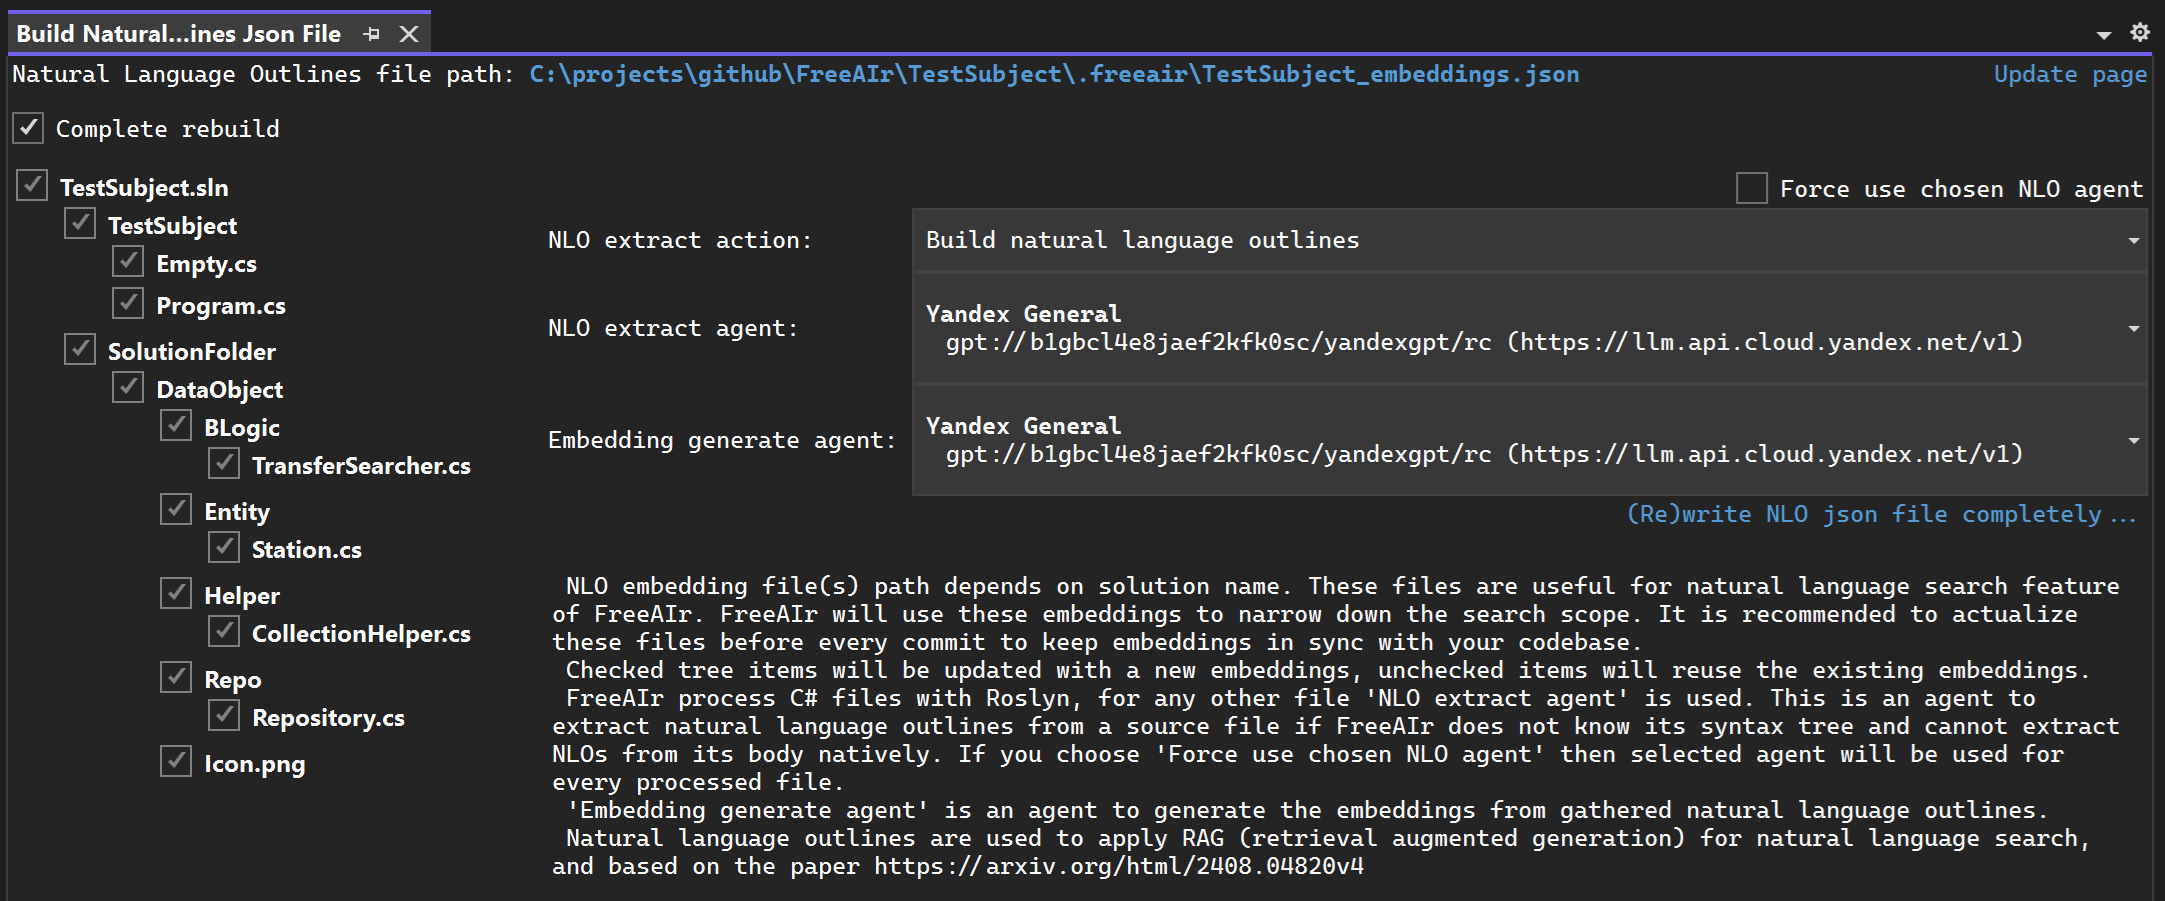
In any case, a window will open:
Set up everything you need and create (update) json files. They are placed next to your solution and consist of three files:
.freeair\<solution name>_embeddings.json— which model built the index and how the vectors are encoded;.freeair\<solution name>_embeddings.outlines.json— all NLOs (as well as regular comments in the code);.freeair\<solution name>_embeddings.embeddings.jsonl— the embeddings, one per line.
If the files are created, then in the menu
the Use RAG checkbox will become available. When selected, FreeAIr vectorizes your query with the same embedding model the json files were built with, finds the outlines closest to it, and passes only the files those outlines belong to to the search engine — instead of all solution or project documents. The results panel shows which files have been picked and why, before the first answer of the LLM arrives, so you can stop a search which is looking in the wrong place.
Two things are worth knowing about it:
- a file which is not in the index is never found, whatever it contains. The panel says how many files of the scope are in that state; rebuild the index to include them.
- how many files reach the LLM is up to you: the
Ragnode of the options json holdsTopOutlineCount,MaxFileCountandSensitivity.
Sensitivity deserves a word, because it is not a similarity. A cosine similarity means something different on every embedding model: the same query on the same solution scores 0.94 on one model, 0.84 on another and 0.70 on a third, and the level their nonsense reaches differs just as much — so a threshold written into a settings file is right for exactly one model and silently wrong for the next one. Instead, at the end of every index build FreeAIr asks the fresh index a handful of questions it cannot answer and measures how high they get. Sensitivity says how far above that measured noise a file has to stand, as a share of the room left up to a perfect match: 0.1 is generous, 0.2 is the default, 0.35 is strict.
The questions live in the same Rag node and are worth writing yourself:
Irrelevant are queries your solution cannot answer. The built-in ones are far-fetched on purpose and therefore weak; a question which is plausible for a codebase yet absent from yours — asking about authentication in a project which has none — sets a much more honest level. Relevant are queries whose answer you know: the threshold is then never allowed to climb up to them, and a query which fails to find its own file is reported at the end of the build as a miss, which means the embedding model does not understand your code and no setting will fix that.
This is a sample, not a catalogue. The threshold is one number for the whole index, so five or ten honest queries pin it down as well as a hundred would, and there is no need to add every question you are ever going to ask. The search also works with no calibration at all — it then applies no threshold and passes every file it ranked.
You do not have to write that node by hand. Extensions → FreeAIr → Open RAG search calibration window... does the same thing by asking:
- type the question you would ask the search and press
Ask. The window lists the files the index offers, with their scores, including the ones the current threshold throws away — a threshold can only be judged by what it cuts. - press
this answers itnext to the right file, ornothing answers thisif the solution genuinely has no answer. Either way the query lands in the list below, which is theCalibrationnode. Recalculatemeasures those queries against the index and shows the new noise and the new threshold. Nothing is written yet, so it costs one request and can be repeated as often as you like.Savewrites the queries into the options json and the measured numbers into the index. The vectors are not rebuilt — they would come out identical, and they are the expensive half — so the search starts using the new threshold immediately.
The window explains all of that in its own words: the block at the top, open on the first visit, describes every button and field on it. Enter does what the button next to the field does — it runs the query in the query box, and commits an edited line of the list below.
The blue line under the window title names the agent every request goes through, and the Agent... button picks a different one. That agent is normally the one the index says built it, and it has to be: the window works against the index which is on disk and refuses to measure anything if the model in front of it is not the model the vectors came from.
The build also records a few vectors of fixed sentences in the index. A search compares them against the model it is holding and refuses to run if they disagree, so an index built by one embedding model is not silently searched with another — two unrelated models of the same vector length, which is a common accident with local servers, otherwise produce an index that reads perfectly and matches nothing.
It is recommended to save these Json files to a git repository so that the natural language search function works for all team members. They are written in an order which does not depend on the machine that built them, and the vectors are stored one per line, so two people rebuilding the index in two branches get a merge instead of a conflict.
WARNING: FreeAIr 4.2.12 changed the format of these files, and the change is not backward compatible. An index built by an earlier version has to be rebuilt.
This is possible. If you are banned only from Copilot:
- Install this VSIX into your Visual Studio. You will need to have Visual Studio 2022 v.17.14 at least.
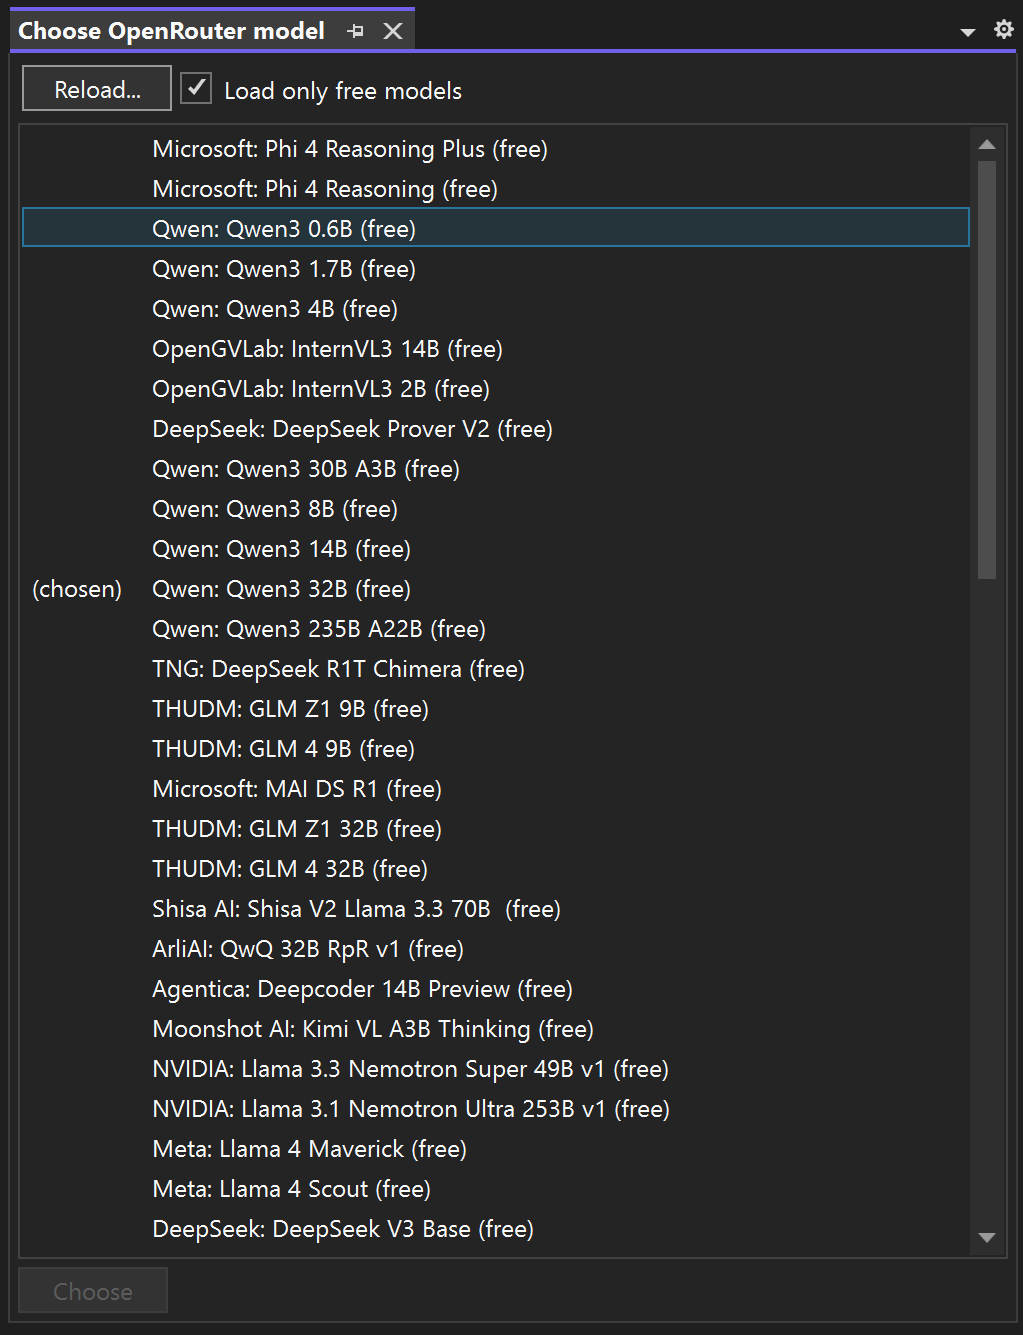
- Register on openrouter.ai. This is easily can be done via github.com account. Also, you can obtain access to any LLM with OpenAI compatible API. FreeAIr itself does not include any LLM.
- Choose any
freemodel at openrouter.ai and create an access token. - Put your token into options page (see screenshot above).
- That's all, enjoy! But remember: for a free LLM openrouter.ai has daily limits (50 prompts per day, if I remember correctly).
FreeAIr itself has no restrictions, you are able to switch another OpenAI compatible API.
If you are banned from any remote LLM then run LLM locally, which is very easy, for example with KoboldCpp: run KoboldCpp, choose the model, wait for KoboldCpp starts (it opens browser), and then use correct OpenAI compatible endpoint like http://localhost:5001/v1.
- openrouter.ai for free access.
- CCodeAI for inspiration.
- L.AI for inspiration.
- KoboldCpp for testing without daily limits.
- Yandex for supporting grant to access Yandex LLMs.
- to you, visitor. Thanks for reading this. If you are enjoying it please consider give it a ★ in the github repo and ★★★★★ rating on the Visual Studio Marketplace.