A DIY wireless rain gauge built around a Wemos D1 mini (ESP8266) and the MS-WH-SP-RG tipping-bucket sensor. It measures precipitation and reports it to Home Assistant over MQTT — with automatic discovery, a built-in web dashboard, and over-the-air firmware updates.
- 🌧 Accurate tip counting — hardware interrupt with software debounce
- 📊 Rich statistics — total, rate (mm/h), today / week / month / year
- 🏠 Home Assistant MQTT discovery — entities appear automatically
- 🌐 Built-in web dashboard — live charts, served straight from the device
- 🔧 Captive-portal setup — pick WiFi + enter MQTT, no credentials in code
- ⬆️ OTA updates — flash new firmware from the browser
- ⏱ NTP time sync — correct daily / weekly / monthly / yearly resets
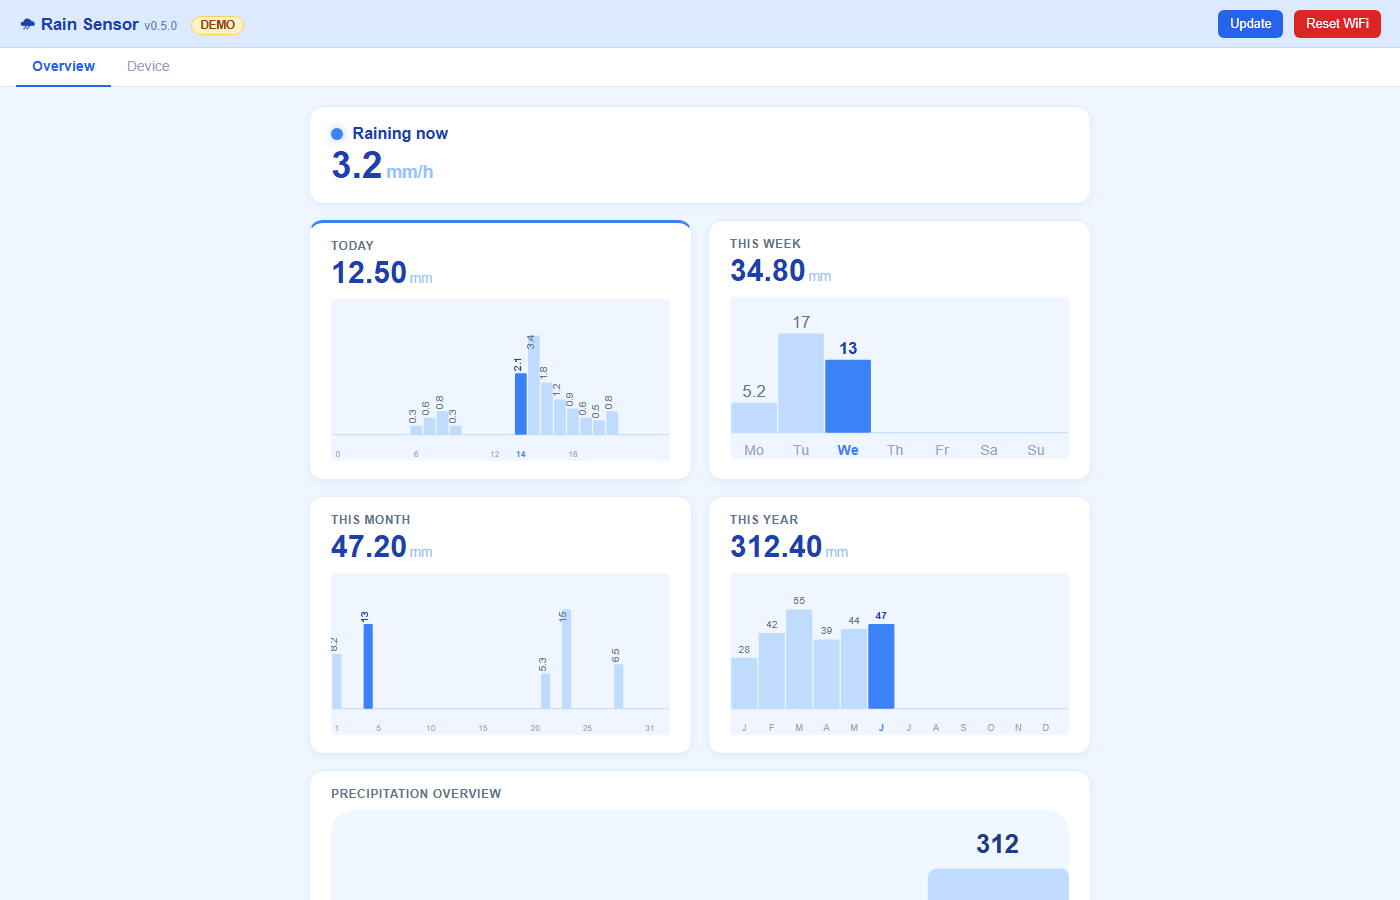
You can try the device's web interface without any hardware — it is a static snapshot of the real dashboard:
| Path | Contents |
|---|---|
src/ |
Firmware source (main.cpp) |
demo/ |
Static preview of the web dashboard + screenshot |
home-assistant/ |
Ready-to-use Home Assistant dashboard template |
3d_print/ |
STL files for the sensor mount |
content/ |
Wiring schematic and other images |
platformio.ini |
PlatformIO build configuration |
firmware-x.y.z.bin |
Pre-built firmware for OTA flashing |
- Rain bucket sensor MS-WH-SP-RG
- Wemos D1 mini development board (4 MB flash, needed for OTA)
The rain gauge uses a reed (magnetic) switch on a ~2.9 m cable. The firmware debounces the signal in software, but on a long cable a single noise spike can be miscounted as a tip when using interrupts. A simple RC filter on the input is recommended:
10 kΩpull-up from D1 to 3V3 (lower impedance than the internal pull-up)100 nFcapacitor from D1 to GND (RC low-pass that smooths noise spikes)1 kΩresistor in series with the reed switch (limits the capacitor's discharge current and protects the reed contacts)
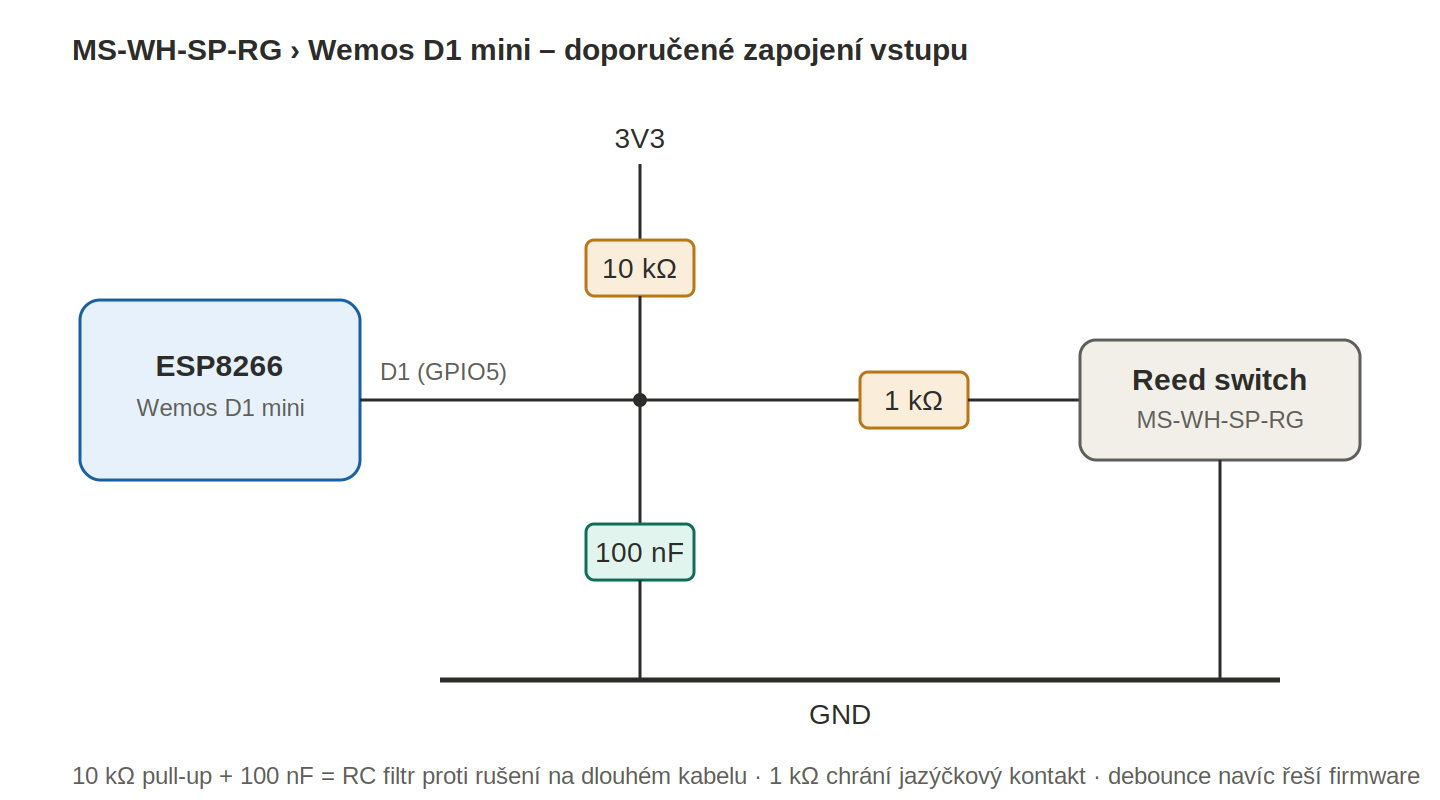
For a short cable next to the board the internal INPUT_PULLUP plus the
software debounce is usually enough.
No credentials are stored in the source code. WiFi and MQTT are configured through a captive portal on first boot:
- Install the MQTT integration in Home Assistant and configure the broker.
- Build and flash the firmware via PlatformIO (4 MB board,
littlefsfilesystem), or upload a pre-builtfirmware-x.y.z.bin. - On first boot the device opens a WiFi access point named
RainSensor-Setup. Connect to it with a phone or laptop. - In the portal, pick your WiFi network, enter its password, and fill in the MQTT host, port, user and password. Save.
- The device reboots, connects, and a new rain sensor device appears in the MQTT integration automatically.
Settings are stored on the device (LittleFS), so they survive reboots and firmware updates.
Once connected, the device serves a dashboard on its IP address (shown in the serial log and your router). It has two tabs:
- Overview — "raining now" with current rate, plus today / week / month / year totals, each with a bar chart.
- Device — IP address, WiFi signal, MQTT status, uptime, free memory and total rain since boot.
Two actions are available from the header:
- Update (
/update) — upload a new firmware.binstraight from the browser (ElegantOTA). - Reset WiFi (
/resetwifi) — clear WiFi settings and reopen the setup portal.
The live demo shows exactly this interface.
All values are sent in a single JSON message and split into entities via value templates, so the device only publishes one MQTT message per update.
| Entity | Type | Unit | Notes |
|---|---|---|---|
| Rain | sensor | mm | cumulative, state_class: total_increasing |
| Rain rate | sensor | mm/h | device_class: precipitation_intensity |
| Rain today | sensor | mm | resets at local midnight |
| Rain this week | sensor | mm | resets Monday |
| Rain this month | sensor | mm | resets on the 1st |
| Rain this year | sensor | mm | resets on Jan 1 |
| Raining | binary_sensor | — | on while it rained in the last 6 min |
| WiFi signal | sensor | dBm | diagnostic |
| Uptime | sensor | s | diagnostic |
| Free memory | sensor | B | diagnostic |
The period totals reset on real calendar boundaries thanks to NTP time sync
(CET/CEST). The cumulative rain uses total_increasing, so Home Assistant
tracks resets (after a reboot) and can build its own long-term statistics.
The send interval adapts automatically: every 60 s while it is raining, every 30 min after 20 minutes without rain.
The per-hour / per-day / per-month bar charts you see on the device are rendered
locally and are not sent over MQTT — there is no need to. Home Assistant can
rebuild them from the cumulative Rain sensor (total_increasing), which feeds
HA's long-term statistics.
A ready-to-use template is provided in
home-assistant/rain-sensor-homeassistant.yaml. It contains:
utility_meterhelpers for today / week / month / year (HA-side resets)- a Lovelace dashboard mirroring the device's Overview and Device tabs, with bar charts built from the built-in
statistics-graphcard (no HACS required) - an optional ApexCharts variant for nicer bars
Check the entity IDs at the top of the file against your install (Settings → Devices & Services → Entities) before pasting it in.
- Visual Studio Code with the PlatformIO extension.
- Open the project, connect the Wemos D1 mini, and run Upload. After the first flash, further updates can be done over WiFi from the
/updatepage.
Pipe holder (50 mm diameter) with an arm to hold the rain sensor. Uses 6 M4 screws with nuts; the sensor is bolted to the arm with a self-tapping screw.
